
高级消息队列协议 (AMQP)
试想一下,如果仅使用一次服务调用,您就可以轻松地请求计算云为您提供 100 个不同位置的温度计读数,会怎么样?或者,也许您想知道您控制下的 89 台服务器的状态。过去,您可能通过编写服务器守护程序来完成这些事情。您的守护程序可能管理着数百个连接中的每一个,对每个连接执行特定的操作。然而,随着 AMQP 和 Apache Qpid 项目的出现,您可以专注于数据处理,而让另一个程序来处理消息传递。
AMQP 是一种创新的开放消息传递协议。AMQ 协议由 John O'Hara 和 JPMorgan 的其他人员创建,旨在取代专有产品,它定义了线路级格式以及消息传递服务器和客户端软件的行为。使用上面的例子,您可以向 AMQP 服务器发送一条消息,主题可以是 server_stats 或 thermometer_readings。AMQP 服务器监听带有这些主题的消息,并将消息路由到连接到 AMQP 服务器的应用程序。
AMQP 始于 2003 年,由 JPMorgan-Chase 的 John O'Hara 发起。O'Hara 正在寻找一种消息传递解决方案,该方案能够提供高持久性、极高的吞吐量和高度的互操作性。在 AMQP 解决的这类环境中,如果消息丢失、延迟到达或处理不当,就会产生经济影响。由于吞吐量大于每秒 500,000 条消息,因此要求很高。当时可用的商业产品无法提供所需的服务水平,众所周知,银行会开发自己的企业中间件来填补空白。然而,开发企业中间件是复杂而困难的,银行中间件也来来去去。
当他反思其他非常成功的协议时,如以太网、TCP/IP 和 HTTP,O'Hara 注意到几个相似之处。即,每个协议都是免版税的,并且不受专利的约束。此外,这些协议都有一个由独立机构创建的强大规范。协议规范的免费实现使开发人员能够快速上手并找到有趣的用途。强大的治理和用户驱动的设计使这些协议在技术和经济上都取得了成功。
对于 AMQP,O'Hara 希望在 JPMorgan 的关键任务场所使用 AMQ 协议的免费实现。考虑到这个目标,他与 iMatix 公司签订合同,创建了第一个实现 OpenAMQ。然后,该实现被投入到拥有 2,000 多用户的交易应用程序中生产使用。
如今,许多公司在 AMQ 上进行协作。有几个代理可用,包括 RabbitMQ、OpenAMQ 和 Apache Qpid(也称为 Red Hat MRG Messaging)。在本文中,我将描述 Apache Qpid 服务器。本文讨论的是 Qpid M4 版本,您可以通过本文“资源”中的链接下载它。我还将演示如何编译和安装 C++ 版本的服务器,并用 Python 编写示例应用程序。
图 1 描述了 Qpid 服务器的剖析。了解 AMQP 服务器的三个组件非常重要:本地队列、服务器队列和交换机。
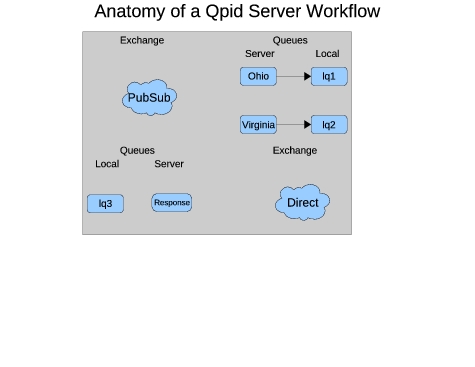
图 1. Qpid 服务器工作流程剖析
交换机根据消息头确定消息传递。交换机可以提供不同的传递方案,例如直接(将此消息传递到队列 XYZ)、发布-订阅(将此消息传递到所有订阅主题 spring.flowers 的队列)和 XML(所有与 XPath 查询 Z 匹配的消息都转到队列 Y)。服务器队列是驻留在服务器上并从交换机接收消息的队列。本地队列是与应用程序实例关联的队列。本地队列绑定到服务器队列,因此传递到服务器队列的任何消息都会出现在本地队列上。多个本地队列可以绑定到一个服务器队列。当您拥有响应请求的机器(或进程)集群时,这非常方便。在这种情况下,消息将以轮询方式从服务器队列传递到本地队列。
除了服务器术语外,请注意,从队列中读取程序的称为消费者,而写入交换机的程序称为生产者。当您的应用程序同时充当消费者和生产者时,这可能会造成混淆。因此,为客户端和服务器使用标准术语是有意义的,其中客户端发送请求并期望在回复队列上获得响应,而服务器监听消息并根据请求进行响应。
此处讨论的 Qpid 代理附带了描述 AMQP 规范的 XML 文件。这些文件定义了服务器和客户端使用的格式。服务器和库使用这些规范来形式化参数,例如线路格式、服务器命令和错误消息。在服务器外部管理这些规范使您能够在不同的服务器供应商和不同的服务器版本之间保持兼容性。理论上,您应该能够用 OpenAMQ、RabbitMQ 或任何其他 AMQP 兼容的服务器替换 Qpid 服务器,并使其开箱即用。在实践中,不同的服务器支持不同版本的规范或需要不同的选项。例如,Qpid Java 客户端支持协议的三个版本:0-8、0-9 和 0-10。但是,C++ 客户端在其最新版本中仅支持 0-10。RabbitMQ 是一个竞争的 AMQP 代理,仅支持规范的 0-8 和 0-9 版本。因此,当使用来自同一产品线的客户端和代理时,效果最佳。
Apache Qpid 及其商业对应产品 Red Hat MRG Messaging 是多功能产品。它们提供了许多本文未涵盖的功能。例如,您可以使用 SSL 和 InfiniBand Fabric 作为互连,并且您可以通过 ACL 和身份验证来控制客户端如何连接到您的服务器。我强烈推荐 Red Hat MRG 文档,以进一步参考这些功能。
首先,关于先决条件。这些示例是在 CentOS 5.2 上使用标准开发包以及 Ruby 创建的。另请注意,某些版本的 PyXML 存在冲突,这些冲突会破坏安装后运行的测试。
要安装服务器,只需从本文“资源”部分中注明的 URL 下载完整的 M4 版本到您首选的开发目录,然后解压该软件包。获得目录结构后,通过键入以下命令转到服务器的目录
cd qpid-M4/cpp
最初,没有 configure 脚本;通过运行bootstrap命令来创建它。bootstrap 完成后,执行标准操作configure, make和make install.
安装过程未执行的一个步骤是安装 AMQP 规范文件。这些规范文件包含在 qpid-M4 下的 specs 目录中。将那里找到的文件复制到 /usr/local/share/qpid/specs。
安装完成后,最好运行测试以确保所有先决条件都已满足。启动一个新的 shell,将目录更改为 /usr/local,然后su切换到 root 用户。然后,使用以下命令运行 Qpid 守护程序
sbin/qpidd -t --auth no
代理运行后,返回到原始 shell。从 cpp 目录移动到 qpid-M4 中包含的 python 目录。使用以下命令运行 Python 测试
run-tests -s 0-10-errata -I cpp_failing_0-10.txt
如果测试运行并且没有返回错误,请继续通过以 root 用户身份运行以下命令来安装 Python 模块
python setup.py install
此示例演示了一个用于查询服务器状态的简单应用程序。服务器脚本运行 rpm 来查询系统上存储的软件包,并将列表及其 PID 返回给客户端。生成请求的程序是客户端,服务器是在“远程服务器”上运行的守护程序。它有一个事件循环,用于等待请求。
在此示例中,脚本结合使用了两种消息路由方法:发布-订阅 (pubsub) 将请求传递到所有监听服务器,直接路由将回复直接路由到调用客户端。
列表 1 描述了客户端,它非常简单明了。首先,客户端读取 spec 文件,然后创建 Qpid 连接。通过创建标准 Python 套接字对象并将该对象传递给连接的构造函数来建立连接。连接反过来在调用 session() 方法时提供会话对象。
列表 1. 客户端 Python 程序
#!/usr/bin/python

from qpid.util import connect, ssl
from qpid.connection import Connection, sslwrap
from qpid.datatypes import Message, RangedSet, uuid4
from qpid.queue import Empty
from qpid.spec import load

# First, load the correct specification file.
amqSpec = load('/usr/local/share/qpid/specs/amqp.0-10.xml')

# Now, connect to the server.
socket = connect("localhost", 5672)
connection = Connection (sock=socket,
                         spec=amqSpec,
                         username = "guest",
                         password = "guest")
connection.start()
session = connection.session(str(uuid4()))

# Declare the reply queue:
replyQueueName = "producerReply_" + session.name
replyQueue = session.queue_declare(queue=replyQueueName,
                                   exclusive=True,
                                   auto_delete=True)
session.exchange_bind(exchange="amq.direct",
                      queue=replyQueueName,
                      binding_key=replyQueueName)

# Declare a local queue to which we subscribe the reply-to queue
localQueueName = "producerLocalQueue_" + session.name
localQueue = session.incoming(localQueueName)
session.message_subscribe(queue=replyQueueName,
                          destination=localQueueName)
localQueue.start()

# Now, create a message with a request.
message_properties = session.message_properties()
message_properties.reply_to = session.reply_to("amq.direct",
                                               replyQueueName)
delivery_properties =
    session.delivery_properties(routing_key="SERVER_STATUS")
requestMsgText = "RPM_STATUS"

# Send the message and wait for a response.
session.message_transfer(destination="amq.topic",
                         message=Message(message_properties,
                                         delivery_properties,
                                         requestMsgText))

while True:
    try:
        message = localQueue.get(timeout=60)
        content = message.body
        session.message_accept(RangedSet(message.id))
        print content
    except Empty:
        print "No more messages!"
        break
接下来,客户端创建回复目标服务器队列。请注意,回复目标服务器队列名称包含会话 ID。这为每个客户端提供了一个唯一的服务器队列。然后,该队列绑定到 amq.direct 交换机,该交换机使用队列名称作为其路由键。使用服务器队列的队列名称并将回复传递到 amq-direct 交换机可确保服务器的多个副本仅接收其自己的回复。
声明服务器队列后,程序将创建一个本地队列并将其订阅到服务器队列。本地队列订阅后,程序就可以传输消息了。
然后,客户端创建请求消息。由于程序正在使用发布-订阅,因此路由键设置为主题。在本例中,主题是 SERVER_STATUS。任何订阅了主题 SERVER_STATUS 的服务器都将接收此特定消息。客户端还为回复目标字段提供交换机类型和路由键。对于此消息,它是 amq-direct 交换机和先前创建的服务器队列的名称。
最后,客户端创建消息本身(文本“RPM_STATUS”)并将其传递到交换机。消息传递后,客户端等待回复并将回复的内容打印到屏幕上。
列表 2 定义了服务器。此应用程序将侦听主题为 SERVER_STATUS 的消息,运行 rpm 以查询系统的软件包内容,并发送回复。前几个步骤与列表 1 类似,服务器启动连接并使用连接获取会话并创建服务器队列。然后,服务器订阅本地队列,启动队列,程序就可以响应请求了。
列表 2. 服务器端 Python 程序
#!/usr/bin/python

import subprocess
import os
from qpid.util import connect, ssl
from qpid.connection import Connection, sslwrap
from qpid.datatypes import Message, RangedSet, uuid4
from qpid.queue import Empty
from qpid.spec import load
from qpid.queue import Empty
from qpid.session import SessionException

# processRequest: this is what actually does the work.
def processRequest(requestMessage):

    print "Servicing Request"
    proc = subprocess.Popen('rpm -qa',
                       shell=True,
                       stdout=subprocess.PIPE,
                       )
    stdout_value = proc.communicate()[0]
    myPid = os.getpid()
    ret_value = "From Server PID " \
                + str(myPid) + ":\n" + stdout_value \
                + "---------------------------------\n"
    return ret_value

# First, load the correct specification file.
locSpec = load('/usr/local/share/qpid/specs/amqp.0-10.xml')

# Now, connect to the server.
socket = connect("localhost", 5672)
connection = Connection (sock=socket,
                         spec=locSpec,
                         username = "guest",
                         password = "guest")
connection.start()
session = connection.session(str(uuid4()))

# Declare the listening server queue and connect to server queue.
# Create server queue if it does not exist.

myPid = os.getpid()
serverQueueName = "serverListenQueue" + str(myPid)

localQueueName = "serverListenLocal_" + session.name
session.queue_declare(queue=serverQueueName,
                      exclusive=True)
session.exchange_bind(exchange="amq.topic",
                      queue=serverQueueName,
                      binding_key="SERVER_STATUS")
session.message_subscribe(queue=serverQueueName,
                          destination=localQueueName)
localQueue = session.incoming(localQueueName)
localQueue.start()

# Now, start an event loop.
while True:
    try:
        requestObj = localQueue.get(timeout=60)
        session.message_accept(RangedSet(requestObj.id))
        requestStr = requestObj.body
        requestProperties = requestObj.get("message_properties")
        replyTo = requestProperties.reply_to
        if replyTo == None:
            raise Exception("This message is missing " \
                            + "the 'reply_to'"  property, " \
                            + "which is required")
        responseMessage = processRequest(requestStr)
        props = session.delivery_properties(
                                 routing_key=replyTo["routing_key"])
        session.message_transfer(destination=replyTo["exchange"],
                                 message=Message(props,
                                                 responseMessage))
    except Empty:
        continue
在事件循环中,服务器首先从本地队列接收请求。如果在超时值(60 秒)内没有请求,则 get() 方法将引发 Empty 异常。由于服务器需要持续服务请求,因此程序捕获 Empty 异常并简单地继续。当消息到达时,服务器运行 processRequest 方法,并使用该方法的返回值构造数据。回复消息从原始消息的回复目标字段获取交换机和路由键信息,然后传递到交换机。
借助 AMQP,可以构建一个排队系统,该系统允许服务器集群响应多种不同类型的请求。此示例考虑天气预报模型。在这里,有不同的服务器集群,每个集群服务一个州。在这种情况下,能够从任意位置向每个服务器集群发送请求将非常方便。
此示例需要三个进程。第一个进程(客户端)传递请求,它与上一个示例中的客户端基本相同。唯一的区别在于它循环遍历一个列表,为俄亥俄州传递十个天气请求,为弗吉尼亚州传递十个请求。在接收端,有两个服务器:一个用于俄亥俄州,一个用于弗吉尼亚州。每个服务器都使用路由键 #.ohio 或 #.virginia 订阅 amq.topic 交换机。此外,每个服务器都能够订阅现有服务器队列或创建不存在的服务器队列。
这些路由键包含通配符。当路由键在文本位置包含井号时,交换机将匹配井号所在位置的任何文本。通过这种方式,使用 #.ohio 的天气预报守护程序也将响应主题 news.ohio 和 sports.ohio 的请求。同样,如果一个体育报道守护程序入侵了集群并正在监听 sports.#,则体育守护程序和俄亥俄州的天气预报守护程序的订阅都将匹配 sports.ohio。
列表 3 包含客户端,列表 4 包含俄亥俄州的服务器。通过复制俄亥俄州的服务器并将所有出现的 Ohio 替换为 Virginia 来创建弗吉尼亚州的服务器。(当您这样做时,请确保所有路由键都使用小写字符。)
列表 3. 多服务器天气客户端
#!/usr/bin/python

from qpid.util import connect, ssl
from qpid.connection import Connection, sslwrap
from qpid.datatypes import Message
from qpid.datatypes import RangedSet
from qpid.datatypes import uuid4
from qpid.queue import Empty
from qpid.spec import load

# First, load the correct specification file.
amqSpec = load('/usr/local/share/qpid/specs/amqp.0-10.xml')

# Now, connect to the server.
socket = connect("localhost", 5672)
connection = Connection (sock=socket,
                         spec=amqSpec,
                         username = "guest",
                         password = "guest")
connection.start()
session = connection.session(str(uuid4()))

# Declare the reply queue:
replyQueueName = "weatherReply_" + session.name
replyQueue = session.queue_declare(queue=replyQueueName,
                                   exclusive=True,
                                   auto_delete=True)
session.exchange_bind(exchange="amq.direct",
                      queue=replyQueueName,
                      binding_key=replyQueueName)

# Declare a local queue to which we subscribe the reply-to queue
localQueueName = "weatherLocalQueue_" + session.name
localQueue = session.incoming(localQueueName)
session.message_subscribe(queue=replyQueueName,
                          destination=localQueueName)
localQueue.start()

# Now, create messages with requests.

weatherStates = ['ohio', 'virginia']

for state in weatherStates:
    for i in range(1, 11):
        message_properties = session.message_properties()
        message_properties.reply_to = session.reply_to("amq.direct",
                                                       replyQueueName)
        routingKey = "weather." + state
        delivery_properties = session.delivery_properties(
                                 routing_key=routingKey)
        requestMsgText = "weather_report"
        session.message_transfer(destination="amq.topic",
                                 message=Message(message_properties,
                                                 delivery_properties,
                                                 requestMsgText))
        print "Sent message " + str(i) + " with key " + routingKey

while True:
    try:
        message = localQueue.get(timeout=60)
        content = message.body
        session.message_accept(RangedSet(message.id))
        print content
    except Empty:
        print "No more messages!"
        break
列表 4. 多服务器服务器端(俄亥俄州)
#!/usr/bin/python

import subprocess
import os
from qpid.util import connect, ssl
from qpid.connection import Connection, sslwrap
from qpid.datatypes import Message, RangedSet, uuid4
from qpid.queue import Empty
from qpid.spec import load
from qpid.queue import Empty
from qpid.session import SessionException

# ProcessRequest: this is what actually does the work.
def processRequest(requestMessage):
    print "Predicting the weather for Ohio"
    myPid = os.getpid()
    ret_value = "From Server PID " \
                + str(myPid) + ": Ohio is sunny and 70!"
    return ret_value

# First, load the correct specification file.
locSpec = load('/usr/local/share/qpid/specs/amqp.0-10.xml')

# Now, connect to the server.
socket = connect("localhost", 5672)
connection = Connection(sock=socket, spec=locSpec,
                        username="guest", password="guest")
connection.start()
session = connection.session(str(uuid4()))

# Declare the listening server queue and connect to server queue.
# Create server queue if it does not exist.

myPid = os.getpid()
listenTopic = "#.ohio"
serverQueueName = "serverListenQueueOhio"
localQueueName = "localQueue_" + str(myPid)
try:
    session.message_subscribe(queue=serverQueueName,
                              destination=localQueueName)
    localQueue = session.incoming(localQueueName)
    localQueue.start()
    print "Successfully attached to existing server queue."
except SessionException, e:
    print "Could not find server queue, so I am creating it."
    session = connection.session(name=str(uuid4()), timeout=0)
    session.queue_declare(queue=serverQueueName, exclusive=False)
    session.exchange_bind(exchange="amq.topic",
                          queue=serverQueueName,
                          binding_key=listenTopic)
    session.message_subscribe(queue=serverQueueName,
                              destination=localQueueName)
    localQueue = session.incoming(localQueueName)
    localQueue.start()
except Exception, e:
    print "Something broke unexpectedly."
    os.exit()

# Now, start a message loop.
while True:
    try:
        requestObj = localQueue.get(timeout=60)
        session.message_accept(RangedSet(requestObj.id))
        requestStr = requestObj.body
        print "Received message."
        requestProperties = requestObj.get("message_properties")
        replyTo = requestProperties.reply_to
        if replyTo == None:
            raise Exception("This message is missing the "
                            + "'reply_to' property, "
                            + "which is required")
        responseMessage = processRequest(requestStr)
        props = session.delivery_properties(
                            routing_key=replyTo["routing_key"])
        print "Responding to request."
        session.message_transfer(destination=replyTo["exchange"],
                            message=Message(props, responseMessage))
    except Empty:
        continue
当您运行此演示时,请为俄亥俄州和弗吉尼亚州服务器各运行多个副本。每个州的消息将由服务器脚本的相应实例以轮询方式拾取。反过来,客户端将打印天气预报列表以及服务器 PID。
AMQ 协议及其开源实现为任何需要高性能、多功能消息通信的人提供了解决方案。正如我在此处演示的那样,使用 Apache Qpid 消息代理是实现这些目标的简便方法。请访问我的博客 www.globalherald.net/jb01,以进一步讨论本文。
资源
Steven Robbins 的“AMQP 是否正在为提供真正的业务互操作性铺平道路?”:www.infoq.com/news/2008/08/amqp-progress
John O'Hara 的“迈向商品企业中间件:AMQP 能否开启消息中间件的新时代?AMQP 标准化消息传递内幕”:queue.acm.org/detail.cfm?id=1255424
Joshua Kramer 白天是汽车玻璃公司 Belron US 的集成专家。晚上,他使用 Linux、Django 和 AMQP 等技术创建独特的社交网络存在。Josh 拥有首都大学的哲学学士学位,居住在俄亥俄州农村。


