
GDL2:GNUstep 数据库库
我之前的几篇文章介绍了图形对象关系建模器 (Gorm) 和 Renaissance,这是 GNUstep 的两个重要项目。本文旨在简要介绍 GDL2——GNUstep 数据库库。虽然本文重点介绍 GDL2,但鼓励读者阅读之前关于 GNUstep 的文章(Linux Journal,2003 年 4 月和 2004 年 3 月),以便更好地理解 Gorm 和 Objective-C 语言。
GDL2 是 EOF(企业对象框架)的免费 (LGPL) 实现。EOF 由 NeXT Computer, Inc. 于 1994 年创建,作为一组 API,用于使用 Objective-C 语言高效开发面向对象的数据库应用程序。它从 NeXTSTEP 上提供的较低级框架 DB Kit 演变而来。Apple 现在实现的 EOF 基于 Java 语言,这使得 Objective-C 开发人员别无选择,只能考虑用 Java 重写他们的应用程序,或者寻找 EOF 的免费实现。GDL2 的目标是与 EOF 4.5 版本兼容。
EOF 分为多个层:EOAccess、EOControl 和 EOInterface。前者的作用是将数据从 RDBMS 传输到企业对象,以及从对象传输到原始数据库数据。EOControl 用于维护企业对象的内存图,并使用 EOAccess 将修改委托给数据库。EOInterface 用于将企业对象映射到用户界面元素。遗憾的是,EOInterface 尚未在 GDL2 中实现。图 1 展示了各个层、它们与 Foundation、AppKit 的关系,以及它们在使用 EOF 的典型客户端/服务器 AppKit 应用程序中的关系。
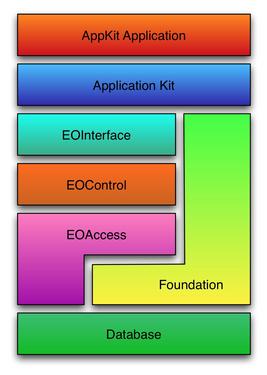
图 1. EOF 架构将统一的面向对象接口应用于各种数据库,无需 SQL 编码。
此外,EOF 允许开发人员创建面向数据库的应用程序,而无需编写任何 SQL。相反,开发人员专注于操作真实对象。此外,当将对对象所做的更改与数据库同步时,EOF 具有验证、强制引用完整性、生成主键和外键、管理事务以及提供锁定(悲观、乐观或按需)的机制,以确保数据的完整性,从而完全消除了应用程序开发人员的负担。
测试应用程序的源代码和所有列表(带有完整注释)可从 Linux Journal FTP 站点获得(请参阅在线资源部分)。您应该参考此源代码,以便更好地理解本文中显示的所有列表。
为了安装 GDL2 并创建我们的测试应用程序,我们首先必须安装 GNUstep 和 Gorm。此外,我们需要安装 PostgreSQL,因为在我们的示例中,我们使用的是 Postgres95 EOF 适配器。
始终建议使用最新的稳定版本。对于本项目,这包括 GNUstep make 1.9.1、GNUstep base 1.9.1、GNUstep GUI 0.9.2、GNUstep back 0.9.2、Gorm 0.7.5 和 PostgreSQL 7.4.2。安装 PostgreSQL 时,请务必安装 libpq 头文件的开发包,因为编译 GDL2 需要它们。Debian 提供 postgresql-dev 包,而 Red Hat 提供 postgresql-devel 包。安装完要求后,继续执行以下命令
# wget ftp://ftp.gnustep.org/pub/gnustep/libs/gdl2-0.9.1.tar.gz
# tar -zxvf gdl2-0.9.1.tar.gz
# cd gdl2-0.9.1
# ./configure
# make
最后,以 root 用户身份
# make install这将从 GNUstep FTP 服务器下载 GDL2 v0.9.1,编译并安装它。
在第一篇 GNUstep 文章中,介绍了模型-视图-控制器 (MVC) 设计模式。当使用 EOF 时,之前文章中描述的大部分控制器逻辑现在由 EOF 自动管理。实际上,应用程序的用户界面成为视图,EOF 成为控制器,数据库本身成为模型。
在本文中,我们创建一个使用 MVC 模型的小型库存管理应用程序。此应用程序显示一个窗口、一个显示库存项目的表格视图和三个按钮,用于更新库存、插入或删除新项目。在创建应用程序之前,我们需要创建我们的库存数据库以及将在我们的测试应用程序中使用的凭据。为此,请继续执行以下命令
% su - postgres
% createuser --pwprompt inventory
Enter password for user "inventory": (specify a password)
Enter it again:
Shall the new user be allowed to create databases? (y/ n) y
Shall the new user be allowed to create more new users? (y/ n) n
CREATE USER

% createdb -O inventory inventory
CREATE DATABASE
创建数据库和用户后,我们接下来创建我们的测试应用程序使用的序列和表。在使用 psql 工具之前,请确保 PostgreSQL 中的身份验证机制配置良好
% psql -U inventory inventory

create sequence inventory_seq start with 1;

create table inventory (
 iid        int4,
 name       varchar(255),
 quantity   int4,
 order_date timestamp,
 primary key (iid)
);
完成与数据库相关的步骤后,我们现在使用 Gorm 创建库存应用程序的用户界面。为此,打开建模器,从“文档”菜单中选择“新建应用程序”。在“检查器”窗口中,将窗口标题设置为“Inventory”。然后,从“调色板”窗口中,将 NSTableView 对象拖到应用程序的窗口,并使用复制/粘贴插入第三个表格列。将表格列的标题设置为“Name”、“Quantity”和“Order Date”。此外,将表格列标识符分别设置为“name”、“quantity”和“order_date”。然后,从“调色板”窗口中将三个按钮拖到应用程序的窗口,并将其各自的标题设置为“Update”、“Insert”和“Delete”。
从“文件”窗口中,单击“类”图标并选择 NSObject 项。从“类”菜单中,选择“创建子类...”。将控制器类重命名为 AppController,并创建 window 和 tableView 输出口。此外,必须添加 insert:、delete: 和 update: 操作。创建输出口和操作后,我们就可以实例化我们的控制器类了。执行此操作,然后连接 window 和 tableView 输出口,在 tableview 上设置 delegate/datasource,并在 window 上设置 delegate/windowController 到我们的应用程序的控制器。
此外,连接按钮上的操作。从“文档”菜单中,选择“保存...”并指定名称 MainMenu.gorm。另外,将 NSOwner 的 delegate 输出口连接到 AppController。最后,从“类”视图中,选择 AppController 并创建类文件 (AppController.h 和 AppController.m)。总的来说,用户界面应如图 2 所示。
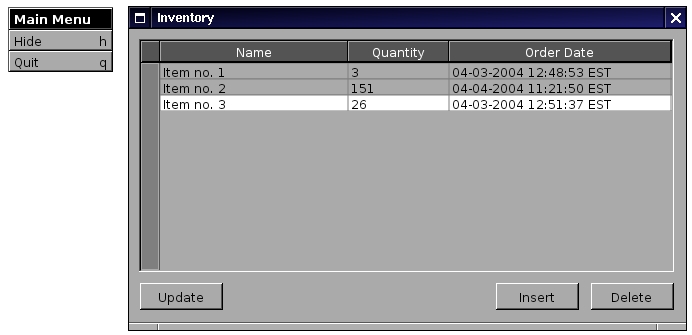
图 2. 库存应用程序的用户界面。
创建用户界面后,在您最喜欢的编辑器中打开 AppController.h,并添加 items 和 editingContext 实例变量,如清单 1 所示。然后,修改 AppController.m 以实现 -delete:、-insert: 和 -update: 方法。此外,您需要添加 -init、-dealloc、-numberOfRowsInTableView、-tableView:objectValueForTableColumn:row:、-tableView:setObjectValue:forTableColumn:row:、-applicationDidFinishLaunching: 方法,以及应用程序入口点 main() 和 EOF 标头所需的 #import 指令。清单 2 显示了应用程序控制器的完整源代码。下一节提供了所有方法的描述。
清单 1. AppController.h
#include <AppKit/AppKit.h>

@interface AppController : NSObject
{
  id window;
  id tableView;
  id items;
  id editingContext;
}
- (void) update: (id)sender;
- (void) delete: (id)sender;
- (void) insert: (id)sender;
@end
清单 2. AppController.m
#include <AppKit/AppKit.h>
#include "AppController.h"

#import <EOAccess/EOAccess.h>
#import <EOControl/EOControl.h>

@implementation AppController

- (id) init
{
  self = [super init];
  items = [[NSMutableArray alloc] init];
  return self;
}

- (void) dealloc
{
  [editingContext release];
  [items release];
  [super dealloc];
}

- (void) update: (id)sender
{
  [items removeAllObjects];
  [items addObjectsFromArray:
           [editingContext objectsForEntityNamed:
                             @"Item"]];
  [tableView reloadData];
}


- (void) delete: (id)sender
{
  int row;

  row = [tableView selectedRow];

  if (row < 0 || row >= [items count])
    {
      NSBeep();
      return;
    }

  [editingContext deleteObject:
                    [items objectAtIndex: row]];
  [editingContext saveChanges];

  [items removeObjectAtIndex: row];
  [tableView reloadData];
}


- (void) insert: (id)sender
{
  id aRecord;

  aRecord = [[EOClassDescription
               classDescriptionForEntityName:
                 @"Item"]
              createInstanceWithEditingContext: nil
              globalID: nil
              zone: NULL];

  [aRecord takeValue: @"<new item>"
           forKey: @"name"];
  [aRecord takeValue: [NSNumber numberWithInt: 0]
           forKey: @"quantity"];
  [aRecord takeValue: [NSCalendarDate date]
           forKey: @"order_date"];
  [editingContext insertObject: aRecord];
  [editingContext saveChanges];

  [items addObject: aRecord];
  [tableView reloadData];
}

- (int) numberOfRowsInTableView: (id) aTableView
{
  return [items count];
}

- (id)           tableView: (id) aTableView
 objectValueForTableColumn: (id) aTableColumn
                       row: (int) rowIndex
{
  id aRecord;

  aRecord = [items objectAtIndex: rowIndex];

  return [aRecord valueForKey:
                    [aTableColumn identifier]];
}


- (void) tableView: (id) aTableView
    setObjectValue: (id) anObject
    forTableColumn: (id) aTableColumn
               row: (int) rowIndex
{
  id aRecord;

  aRecord = [items objectAtIndex: rowIndex];
  [aRecord takeValue: anObject
           forKey: [aTableColumn identifier]];
  [editingContext saveChanges];
}

- (void) applicationDidFinishLaunching: (id) not
{
  EODatabaseContext *aDatabaseContext;
  EOModelGroup *aModelGroup;
  EODatabase *aDatabase;
  EOModel *aModel;

  aModelGroup = [[EOModelGroup alloc] init];
  aModel = [aModelGroup
             addModelWithFile:
               @"tool/Inventory.eomodeld"];
  [EOModelGroup setDefaultGroup: aModelGroup];
  [aModelGroup autorelease];

  aDatabase = [[EODatabase alloc] initWithModel:
                                    aModel];
  [aDatabase autorelease];

  [[aDatabase adaptor] runLoginPanel];

  aDatabaseContext = [[EODatabaseContext alloc]
                       initWithDatabase: aDatabase];

  [[EOObjectStoreCoordinator defaultCoordinator]
    addCooperatingObjectStore: aDatabaseContext];
  [aDatabaseContext autorelease];

  editingContext = [[EOEditingContext alloc]
                     init];
}
@end

int main(int argc, const char *argv[], char *env[])
{
  [NSApplication sharedApplication];
  NSApplicationMain(argc, argv);

  return EXIT_SUCCESS;
}
修改 AppController 文件后,继续创建用于编译我们应用程序的 GNUmakefile,以及用于指定应用程序名称、描述和启动时要加载的主 Gorm 文件名称的 InventoryInfo.plist 文件。清单 3 和 4 显示了这些文件的内容。
清单 3. GNUmakefile
include $(GNUSTEP_MAKEFILES)/common.make
include $(GNUSTEP_MAKEFILES)/Auxiliary/gdl2.make
APP_NAME = Inventory
Inventory_OBJC_FILES = AppController.m
Inventory_RESOURCE_FILES = MainMenu.gorm
ADDITIONAL_OBJCFLAGS = -Wall -Wno-import
include $(GNUSTEP_MAKEFILES)/application.make
清单 4. InventoryInfo.plist
{
  ApplicationName = "Inventory";
  ApplicationDescription = "Inventory application.";
  NSMainNibFile = "MainMenu";
}
然后,我们需要以编程方式创建我们的 EOModel。EOModel 是数据库中存储的数据与企业对象之间的对应关系。它为数据库中的表及其属性以及与表列对应的关系定义实体。清单 5 显示了 tool/model.m,这是用于创建我们的应用程序使用的模型的工具。为了简单起见,我们的小型库存应用程序的模型仅定义一个实体。
清单 5. tool/model.m
#import <Foundation/Foundation.h>
#import <EOAccess/EOAccess.h>

int main(int arcg, char *argv[], char **envp)
{
  NSAutoreleasePool *pool;
  EOAttribute *theAttribute;
  EOEntity *theEntity;
  EOModel *theModel;

  pool = [[NSAutoreleasePool alloc] init];

  theEntity  = [[EOEntity alloc] init];
  [theEntity setName: @"Item"];
  [theEntity setExternalName: @"INVENTORY"];
  [theEntity setClassName: @"EOGenericRecord"];

  theAttribute = [[EOAttribute alloc] init];
  [theAttribute setName: @"iid"];
  [theAttribute setColumnName: @"IID"];
  [theAttribute setValueClassName: @"NSNumber"];
  [theAttribute setExternalType: @"int4"];
  [theEntity addAttribute: theAttribute];

  [theEntity setPrimaryKeyAttributes:
               [NSArray arrayWithObject:
                          theAttribute]];
  [theEntity setAttributesUsedForLocking:
               [NSArray arrayWithObject:
                          theAttribute]];

  theAttribute = [[EOAttribute alloc] init];
  [theAttribute setName: @"name"];
  [theAttribute setColumnName: @"NAME"];
  [theAttribute setValueClassName: @"NSString"];
  [theAttribute setExternalType: @"varchar"];
  [theAttribute setWidth: 255];
  [theEntity addAttribute: theAttribute];

  theAttribute = [[EOAttribute alloc] init];
  [theAttribute setName: @"quantity"];
  [theAttribute setColumnName: @"QUANTITY"];
  [theAttribute setValueClassName: @"NSNumber"];
  [theAttribute setExternalType: @"int4"];
  [theEntity addAttribute: theAttribute];

  theAttribute = [[EOAttribute alloc] init];
  [theAttribute setName: @"order_date"];
  [theAttribute setColumnName: @"ORDER_DATE"];
  [theAttribute setValueClassName: @"NSCalendarDate"];
  [theAttribute setExternalType: @"timestamp"];
  [theEntity addAttribute: theAttribute];

  [theEntity setClassProperties:
               [theEntity attributes]];

  theModel = [[EOModel alloc] init];
  [theModel setName: @"Inventory"];
  [theModel setAdaptorName: @"Postgres95"];

  [theModel setConnectionDictionary:
              [NSDictionary dictionaryWithObject:
                              @"inventory"
                            forKey:
                              @"databaseName"]];

  [theModel addEntity: theEntity];

  [theModel writeToFile: [theModel name]];

  [pool release];

  return EXIT_SUCCESS;
}
对于我们的小型库存应用程序,我们对描述我们库存表的 EOEntity 对象使用 EOF 的内置 EOGenericRecord 类。我们可以轻松地定义我们自己的 Item 类并用它代替 EOGenericRecord,以便例如,自动验证对象可以通过 mutation 方法接受的值。在清单 5 中,我们还指定了用于我们的 EOEntity 的属性映射。例如,iid 属性映射到我们的 IID 数据库列,并对应于实体的主键。此外,它用于更新期间的锁定。当从数据库读取值(类型为 int4)时,EOF 会自动创建一个 NSNumber 实例来保存相应的值。对于要提取到应用程序中的其他三个属性:name、quantity 和 order_date,也执行相同的操作。在离开工具的 main() 函数之前,我们设置要使用的适配器的名称(在本例中为 Postgres95)和数据库名称。然后我们将 EOModel 写入磁盘。
要编译该工具,必须创建一个小的 GNUmakefile。清单 6 是 GNUmakefile。
清单 6. tool/GNUmakefile
include $(GNUSTEP_MAKEFILES)/common.make
include $(GNUSTEP_MAKEFILES)/Auxiliary/gdl2.make
TOOL_NAME = model
model_OBJC_FILES = model.m
ADDITIONAL_OBJCFLAGS = -Wall -Wno-import
include $(GNUSTEP_MAKEFILES)/tool.make
after-clean::
        rm -rf Inventory.eomodeld
after-distclean::
        rm -rf inventory.eomodeld
在运行测试应用程序之前,我们首先必须只运行一次创建我们的 EOModel 的工具。为此,请继续执行以下命令
# cd tool
# make
# opentool shared_obj/model
这将创建 Inventory.eomodeld 目录,其中包含有关我们的 EOModel 的所有信息(两个 plist 文件)。要编译和运行我们的测试应用程序,请继续执行以下命令
# cd ..
# make
# openapp Inventory.app
应用程序完成启动后,会自动调用 -applicationDidFinishLaunching:。在此方法中,我们添加了从我们的模型初始化 EOF 的代码。我们还运行 PostgreSQL 的适配器登录面板(如图 3 所示),以指定我们要使用的用户名/密码和数据库名称。将来,GDL2 将提供直接从登录面板创建数据库的可能性。现在,从此面板中,在“用户名:”和“数据库:”字段中输入 inventory,在“密码:”字段中输入您在创建库存用户时分配给它的密码。然后,单击“确定”按钮。

图 3. 登录到库存应用程序
在 Inventory 应用程序中,单击“更新”按钮会调用 -update: 方法。在此方法中,我们从数据库中获取所有项目。每个项目(对应于数据库行)都是 EOGenericRecord 类的实例。EOF 完成获取项目后,我们重新加载表格视图。这样做会自动调用 -numberOfRowsInTableView: 和 -tableView:objectValueForTableColumn:row:。前者返回获取的企业对象的数量,而后者首先获取与显示的行对应的 EOGenericRecord 实例,并使用键-值编码 (KVC) 返回表格列的适当值。
单击“插入”按钮会调用 -insert: 方法,在该方法中,我们创建一个 EOGenericRecord 实例,设置初始值(使用 KVC),然后将其注册以插入到我们的 EOObjectStore 中。EOF 使用数据库序列自动生成唯一 ID,并创建一个数据库行。最后,单击“删除”按钮会调用 -delete: 方法。在此方法中,我们从 EOOjectStore 中删除我们的企业对象,这将删除数据库行。
我们的测试应用程序也支持在表格视图上进行实时编辑。-tableView:setObjectValue:forTableColumn:row: 方法的实现为我们提供了对此功能的支持。在此方法中,我们首先获取与我们编辑的行对应的企业对象。然后,我们根据我们的 EOModel 对象,将修改后的值设置为正确的键,该键映射到正确的表格列。
正如您在本文中看到的,GDL2 提供了一个完整的框架,用于在 GNUstep 上开发面向数据库的应用程序。将 GDL2 应用程序移植到 Mac OS X 也是完全可能的。包含 PostgreSQL 适配器的 GDL2 的 Mac OS X 二进制包可直接从 GNUstep FTP 服务器获得。
此外,最近已经做了大量工作来开发 EOModeler 的完整克隆,这简化了 EOModel 的创建。我们可能很快就不再需要以编程方式创建模型或手动编写 plist 文件。此外,PostgreSQL 不是 GDL2 唯一支持的数据库;MySQL 的支持也在开发中。适配器也可以很容易地为其他数据库、平面文件、LDAP 或任何可以优雅地映射到企业对象的数据馈送开发。
EOF 是一个用于开发面向数据库的应用程序的有趣框架。EOF 的后期版本与 WebObjects 捆绑在一起,WebObjects 是一个用于创建动态基于 Web 的应用程序的完整框架。GNUstep 项目提供了 WebObjects 的免费实现,名为 GNUstepWeb。将这项技术与 EOF 结合使用肯定是一个成功的组合,我们希望在即将发表的文章中介绍这一点。
Gorm: www.gnustep.org/experience/Gorm.html
Renaissance: www.gnustep.it/Renaissance/index.html
“GNUstep 编程入门”:www.linuxjournal.com/article/6418
关于 GDL2 的 GNUstep Wiki:wiki.gnustep.org/index.php/GDL2
WebObjects 4.5 开发者文档:developer.apple.com/documentation/LegacyTechnologies/Web Objects/WebObjects_4.5/webobjects.html
MySQL EOF 适配器:mysqleoadaptor.sourceforge.net
Ludovic Marcotte (ludovic@inverse.ca) 拥有蒙特利尔大学计算机科学学士学位。他目前是 Inverse, Inc. 的软件架构师,Inverse, Inc. 是一家位于蒙特利尔市中心的 IT 咨询公司。
