
网站图像的自动化 GIMP 处理
GIMP 是一款出色的交互式图像编辑器,但它也可用于自动化创建网站所涉及的日常任务。旨在销售产品而不是提供技术文本内容的商业网站往往严重依赖图像来吸引用户。本文是关于使用 GIMP 为此类图像丰富的网站创建视觉效果。本文针对的网站通常不使用 Flash,并且有望实现跨浏览器工作,这意味着它们支持 Internet Explorer 对 alpha 蒙版的限制。
在本文中,我忽略了 HTML 和样式表的细节,专注于使用 GIMP 进行批量图像处理。最低限度需要工作的两个主要图像目标是具有单位 alpha 蒙版的 8 位 GIF 和根本没有辅助 alpha 支持的 JPEG。不幸的是,PNG 等提供良好 8 位 alpha 蒙版的图像格式不能用于面向非技术受众的跨浏览器网站。许多人仍然在使用操作系统默认附带的浏览器,而企业往往不想忽视潜在客户。
例如,考虑一个想要拥有平铺背景图像、椭圆形按钮以及带有阴影的侧面板和图像的站点,这些图像不局限于均匀地位于侧面板内。网站的一部分是展示各种产品的图像,这些图像将很好地阴影化和/或抗锯齿地位于背景或网站上另一个随机像素偏移的顶部。
单位 alpha 蒙版对于在复杂背景图像之上显示多种类型的图像没有用。这是因为某些图像的边缘需要显式地混合到背景颜色,以避免看起来锯齿状。使用单位 alpha 蒙版,背景颜色需要非常稳定才能使图像的整个周边看起来可以接受。
例如,我在这里展示了制作如图 1 所示的合成效果是多么容易,最终图像没有图 2 中的图层透视效果。此示例是一张蛋糕图像,一半放在侧面板上,一半放在页面背景上——就好像用户现在随意地把蛋糕稍微放在一边。显示的图层可以存储在不同的 xcf 文件中,以便于维护,并使用 GIMP 脚本正确地合成为 caramel-cake.jpg,该文件可以包含在网站中。
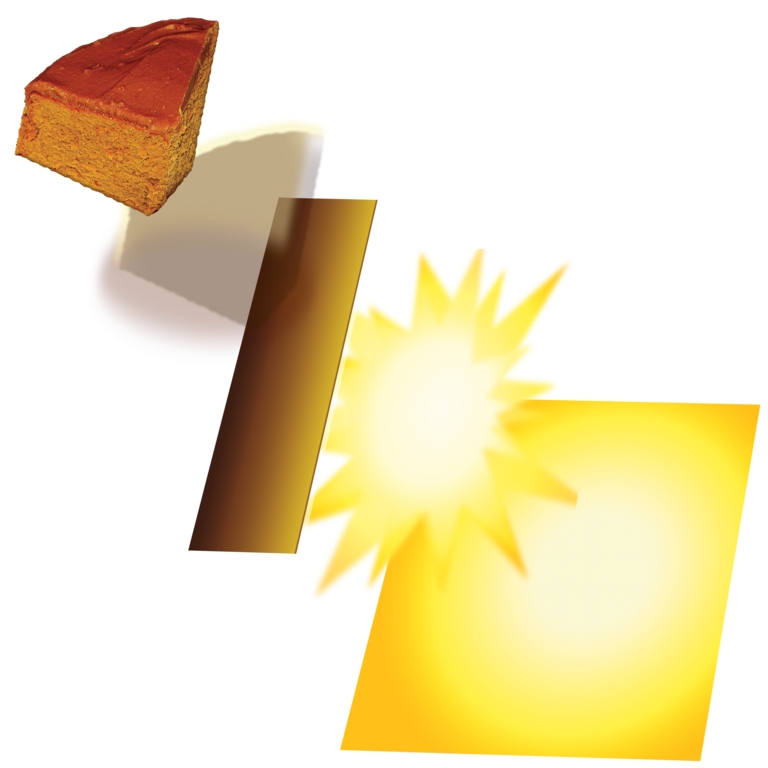
图 1. 蛋糕被合成到阴影上,稍微放置在边框图层之上,并在网页背景上突出显示。
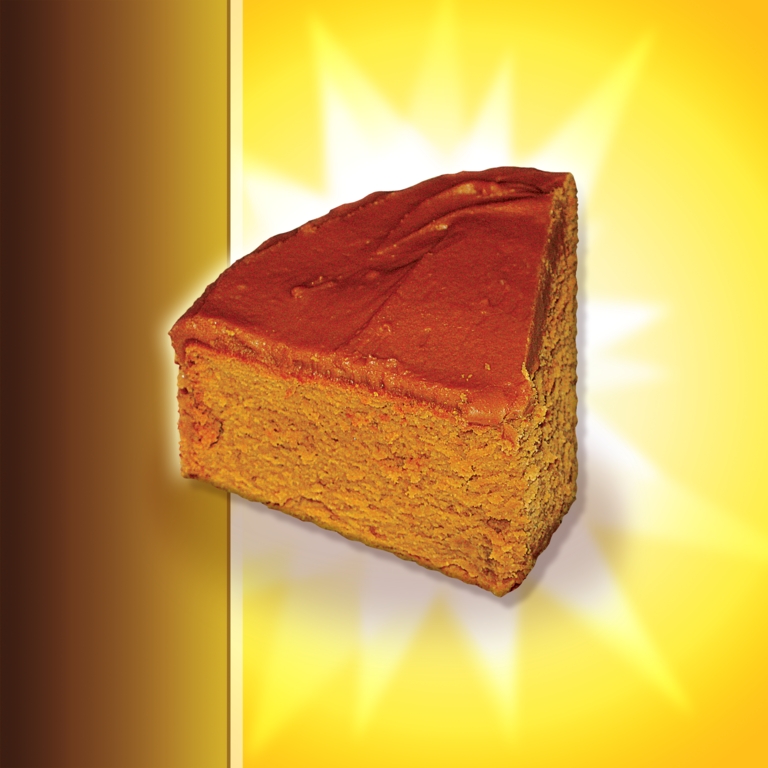
图 2. 将蛋糕与背景和侧面板合成
不幸的是,某些发行版不再打包 gimp-perl。它可从 ftp.gimp.org 获取 GIMP 2.x 版本,一旦安装了 perl-PDL 和 perl-ExtUtils-Depends 以及 GIMP、gimp-devel 和 GTK+ 2.x 的 Perl 绑定,就可以使用清单 1 中所示的经典 CPAN 三件套安装模块本身。
清单 1. 编译并安装 gimp-perl。
perl Makefile.PL ; make;
su -l;
make install;
启动不带 GUI 的 GIMP,准备好使用以下命令处理 Perl 命令
gimp -i -b '(extension-perl-server 0 0 0)' &
本文中显示的脚本倾向于遵循采用单个图像作为输入并生成单个输出图像的模式,以尝试模仿 Linux 命令行管道。不幸的是,本文中的脚本无法管道连接在一起,而是依赖于临时图像文件来保存每个图像修改。图像使用 -inputimage 参数传入,-outputimage 参数用于命名图像保存位置,以便下一个脚本处理。
请注意,应使用完整路径指定两个图像,以确保 GIMP 将它们放置在您期望的位置。
更复杂的翻译可以简化为一个 Perl 脚本。虽然由于额外的图像保存/加载周期,使用许多较小的脚本速度较慢,但这对于批量处理图像来说不太重要。好处是,一旦了解了这些小脚本,就可以从命令行和 Makefile 中快速地将它们串在一起。常用实用程序函数已移至 MonkeyIQGIMP 模块,以便可以快速创建许多小的图像编辑脚本。
作为第一个示例,假设我们有一个具有完整 8 位透明度的图像文件,并且我们想要将该图像导出为具有单位 alpha 蒙版的 GIF。为了使此图像看起来最佳,我们首先应该对非完全不透明或完全透明的像素执行一些处理。此类半透明像素应与所需的背景颜色混合,以避免在网站上显得锯齿状。
该图像是一个按钮(图 3),其柔和阴影混合到灰色背景。如果此按钮导出为具有单位 alpha 蒙版的图像而不进行任何特殊处理,则可能会看起来很差。与灰色背景的锯齿感将合并到导出的图像本身中,并且如果网站具有不同的彩色背景,则它不会给出令人愉悦的外观,如图 4 所示。忽略选择鲜绿色作为背景的糟糕选择,边缘非常锯齿状,并且柔和阴影效果丢失了。

图 3. 柔和阴影后带有灰色背景的按钮

图 4. 旨在在柔和阴影后具有灰色背景的按钮,使用单位 alpha 蒙版导出并叠加在不同颜色的背景上。
清单 2 中显示的代码采用 GIMP 支持的任何图像文件、输出文件路径和预期的背景颜色,并创建一个适合与单位 alpha 蒙版一起使用的输出图像。输入和输出图像都可以是 GIMP 可以读取或写入的任何内容。对于此脚本,最有可能读取 xcf 文件并写入 PNG 文件。PNG 图像稍后使用导出到 webgif 脚本进行处理以获得最终图像。
清单 2. 将具有 8 位 Alpha 的 xcf 导出为具有单位预处理 Alpha 的图像
#!/usr/bin/perl

use Gimp ":auto";
use Gimp::Fu;
use lib '/usr/local/bin/';
use MonkeyIQGIMP;

sub monkeyiq_gimp_convert {
  my( $inputimagename, $outfilename,
      $aliascolor ) = @_;

  Gimp->palette_set_foreground( $aliascolor );

  $img = Gimp->file_load( $inputimagename,
                         $inputimagename );
  $layer = Gimp->layer_new(
     $img,
     Gimp->image_width( $img ),
     Gimp->image_height( $img ),
     RGBA_IMAGE,
     "background merge image",
     100, NORMAL_MODE );
  Gimp->image_add_layer( $img, $layer, -1 );
  Gimp->image_lower_layer( $img, $layer );
  Gimp->edit_fill( $layer, BACKGROUND_FILL );

  $oldlayer =
    Gimp->image_merge_visible_layers(
      $img, EXPAND_AS_NECESSARY );
  Gimp->layer_set_name( $oldlayer, "oldlayer" );

  Gimp->selection_none( $img );
  $threshold = 1;
  Gimp->by_color_select( $oldlayer, $aliascolor,
                 $threshold, 0, 1, 0, 0, 0 );
  Gimp->selection_invert( $img );

  ##################################################

  $newlayer = Gimp->layer_new( $img,
                        Gimp->image_width( $img ),
                        Gimp->image_height( $img ),
                        1, "test xl", 100, 0 );
  Gimp->image_add_layer( $img, $newlayer, -1 );
  Gimp->edit_fill( $newlayer, TRANSPARENT_FILL );
  Gimp->edit_copy( $oldlayer );
  my $floatobject = Gimp->edit_paste( $newlayer,0 );
  Gimp->floating_sel_anchor( $floatobject );

  ##################################################

  # delete old background layer
  Gimp->layer_set_visible( $oldlayer, 0 );
  Gimp->layer_set_visible( $newlayer, 1 );

  imageOutput( $img, $outfilename );
}

register "monkeyiq_gimp_alias",
  "Alias alpha values to a background color",
  "Alias alpha values to a background color (and then
   remake one bit trans)",
  "Ben Martin", "Ben Martin",
  "2007-Mar-16",
  "<Toolbox>/Xtns/Perl-Fu/Alias As X",
  "*",
  [
   [PF_STRING, "inputimage",
     "Name of image to export", ""],
   [PF_STRING, "outputimage",
     "Name of image to save to", ""],
   [PF_COLOR,  "aliascolor",
 "Background color to alias with", ""],
  ],
  \&monkeyiq_gimp_convert;

if( $#ARGV <= 0 ) {
  print "Usage: $0 -inputimage imagepath";
  print " -outputimage full_dst_path";
  print " -aliascolor #000000 \n\n";
  exit;
}

# Handle over control to gimp
exit main();
让我们逐步了解清单 2 中的代码。首先,导入 GIMP API,然后声明脚本的主函数,其参数清楚地声明为变量。暂时跳过函数本身,脚本底部有一个注册调用,为 GIMP 提供一些元数据,说明此脚本应出现在菜单中的位置以及它期望的参数数量和类型,以及对上面实际执行工作的函数的引用。在将控制权交给 GIMP 之前,会进行少量参数检查。
在处理完元数据处理代码后,让我们回到 monkeyiq_gimp_convert 函数。加载指定的图像文件,并创建一个新图层 $layer,其尺寸与图像本身相同,并将填充指定的背景颜色。然后将此新图层放在底部,并合并可见图层。这使得图像中的所有透明度都根据新背景图层的颜色进行评估。在灰色背景上的按钮的情况下,假设输入 xcf 文件隐藏了灰色背景图层,如果脚本以指定的鲜绿色背景颜色运行,则柔和的阴影会根据每个像素的旧 alpha 值与绿色混合。接下来,使用指定的背景颜色执行选择,并且反转该选择。因此,选择应包含图像中的所有内容,并有效地为图像中应完全透明的像素定义单位 alpha 蒙版。
下一个块向图像添加另一个新图层 $newlayer,其中包含透明颜色,然后它将上述合并图层(背景颜色以外的所有内容)中的选择复制并粘贴到新图层中。我们不再需要旧的合并图像图层,因此将其设置为隐藏,并且仅显示新图层。
结果是新图层包含旧图像数据,该数据已将任何部分透明像素与指定的背景颜色合并。只有一个颜色是透明的,其余都是完全不透明的。
imageOutput 函数是 MonkeyIQGIMP 模块中的一个小实用程序函数,用于处理保存到本机 GIMP xcf 文件,但如果需要非 xcf 文件,它也会执行一些合理的处理。MonkeyIQGimp 的部分内容显示在清单 3 中。imageOutput 函数只是调度到 gimp_*_save() 函数之一,唯一的区别是对于非本机格式,首先调用 getMergedLayer() 以获取要导出的单个图层。在 getMergedLayer() 中,如果只有一个图层,我们就完成了;否则,我们合并可见的图层并返回它。如果存在多个图层,但没有一个图层可见,则代码会创建一个单图层以返回,以避免调用代码出现运行时错误。如果没有任何内容可见,则与保存完全透明的图层相同。
清单 3. MonkeyIQgimp 保存函数
#!/usr/bin/perl

package MonkeyIQGIMP;

use Gimp ":auto";
use Gimp::Fu;
require Exporter;
...

sub imageOutput {
  my( $img, $outfilename ) = @_;

  if( $outfilename =~ ".xcf" )
    {
      print "Save to xcf file $outfilename\n";
      Gimp->xcf_save( 0, $img, 0,
          $outfilename, $outfilename );
    }
  else
    {
      $layer = getMergedLayer( $img );
      Gimp->file_save( $img, $layer,
         $outfilename, $outfilename );
    }
  Gimp->image_delete( $img );
}

sub getMergedLayer {
  my( $img ) = @_;

  my $existinglayer =
    Gimp->image_get_active_layer($img);

  @layers = Gimp->image_get_layers( $img );
  print "layers size:" . $#layers . "\n";

   if( $#layers <= 1 )
     {
       $layer = Gimp->image_get_active_layer($img);
     }
  else
     {
       $layer =
        Gimp->image_merge_visible_layers( $img, 1 );
     }

  if( $layer == 0 )
    {
      print "Creating a new layer to merge in\n";
      $newlayer = Gimp->layer_new(
        $img,
        Gimp->image_width( $img ),
        Gimp->image_height( $img ),
        $existinglayer->type(), "trans merge layer",
        100, NORMAL_MODE );
      Gimp->image_add_layer( $img, $newlayer, -1 );
      Gimp->edit_fill( $newlayer, TRANS_IMAGE_FILL);
      $layer =
        Gimp->image_merge_visible_layers( $img, 1 );
    }

  return $layer;
}
要生成正确锯齿化的按钮,请运行清单 4 中显示的命令。结果将如图 5 所示。请注意,阴影现在是到绿色背景的柔和渐变。
清单 4. 将按钮与难看的绿色背景颜色合并。
gimp-monkeyiq-alias \
  -inputimage  Button-with-8bit-alpha.xcf \
  -outputimage Button-nicely-merged-with-green.png \
  -aliascolor '#00ff00'
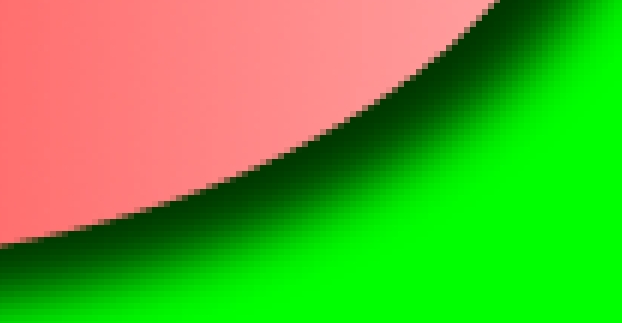
图 5. 绿色背景现在在部分透明像素中发挥作用。
最终输出 GIF 图像是使用清单 5 中显示的命令创建的。
有关使用 gimp-monkeyiq-webgif 在 Internet 上使用的 GIF 文件的更具体图像设置,请参见清单 6。在这里,GIF 的深度设置为小于 256 色,并且图像经过抖动处理以尝试补偿可用颜色数量的减少。
清单 5. 最后,转换为用于 Internet 的 6 位 GIF。
$ gimp-monkeyiq-webgif \
   -inputimage Button-nicely-merged-with-green.png \
   -outputimage Button.gif  -dither 1 -depth 64
$ identify Button.gif
Button.gif GIF 317x213 317x213+0+0 PseudoClass ...
清单 6. 导出到具有一些方便选项的 GIF 图像。我们真的需要此图像的 8 位吗?
...
sub gif_to_web {
  my($inputimagename, $outfilename,
       $num_cols, $use_dither) = @_;
  my $palette_type = 0;

  $img = Gimp->file_load( $inputimagename,
                          $inputimagename );
  Gimp->convert_indexed( $img, $use_dither,
     $palette_type, $num_cols, 0, 1, "" );

  imageOutput( $img, $outfilename );
}
...
  [
   [PF_STRING, "inputimage",
      "Name of image to export", ""],
   [PF_STRING, "outputimage",
      "Name of image to save to", ""],
   [PF_INT,    "depth",   "depth", "255"],
   [PF_INT,    "dither",  "dither", "1"],
  ],
由于 imageOutput() 默认导出图像的所有可见图层,因此其他一些脚本允许您分割 xcf 文件中的图层,以仅使所需的图层可见,从而导出到最终图像。忽略每个脚本的样板注册代码,可以使用清单 7 中显示的脚本隐藏所有图层。然后,可以使用正则表达式来显示所需的图层(清单 8)。
Layers_hideAll() 和 Layers_showByRE() 函数位于共享的 MonkeyIQGIMP 模块中,因此所有脚本都可以轻松地切换图层可见性。
清单 7. 使输出图像中的所有图层都隐藏。
#
# Hide all layers
#
sub Layers_hideAll {
  my( $img ) = @_;

  @layers = Gimp->image_get_layers( $img );
  foreach $l (@layers) {
    Gimp->layer_set_visible( $l, 0 );
  }
}
...
sub monkeyiq_gimp_layers_hideall {
  my($inputimagename,$outfilename) = @_;

  $img = gimp_file_load( $inputimagename,
                         $inputimagename );
  Layers_hideAll( $img );

  gimp_xcf_save( 0, $img, 0,
              $outfilename, $outfilename );
  gimp_image_delete( $img );
}
清单 8. 显示名称与给定正则表达式匹配的图层。
sub Layers_showByRE {
  my( $img, $layersre ) = @_;

  @layers = Gimp->image_get_layers( $img );
  foreach $l (@layers) {
    $n = Gimp->layer_get_name( $l );
    if( $n =~ m/$layersre/ )
      {
	Gimp->layer_set_visible( $l, 1 );
      }
  }
}
...
sub monkeyiq_gimp_layers_hideall {
  my($inputimagename,$outfilename,$layersre) = @_;

  $img = gimp_file_load( $inputimagename,
                         $inputimagename );
  Layers_showByRE( $img, $layersre );

  gimp_xcf_save( 0, $img, 0,
                 $outfilename, $outfilename );
  gimp_image_delete( $img );
}
在继续之前,让我们再看一个简单的脚本。鼠标悬停事件的预亮图像的生成可以通过调整每个图层的亮度或对比度来实现自动化。
脚本及其参数显示在清单 9 中。亮度稍有增加(例如增加到 5 或 10)通常足以为许多图像制作快速预亮图像。
清单 9. 为鼠标悬停事件创建快速预亮图像。
...
sub monkeyiq_gimp_prelight {
  my($inputimagename,$outfilename,
      $brightness, $contrast ) = @_;

  $img = gimp_file_load( $inputimagename,
                         $inputimagename );

  print "prelight $inputimagename";
  print " to $outfilename\n";
  @layers = gimp_image_get_layers( $img );
  foreach $l (@layers)
    {
      gimp_brightness_contrast( $l,
         $brightness, $contrast );
    }
  imageOutput( $img, $outfilename );
}
...
  "*",
  [
   [PF_STRING, "inputimage",
     "Name of image to export", ""],
   [PF_STRING, "outputimage",
     "Name of image to save to", ""],
   [PF_INT,    "brightness",
     "-127 to 127", ""],
   [PF_INT,    "contrast",
     "-127 to 127", ""],
  ],
...
现在,假设我们有一个充满产品图像 xcf 文件的目录,并且我们想要将所有这些图像合成到背景图像上,并将它们保存为具有相同基本名称的 JPEG 文件。这可以从清单 10 中所示的 Makefile 驱动。Makefile 为当前目录中的每个 xcf 文件定义一个 JPEG 目标。所有这些 JPEG 目标的处理方式都相同,并且 JPEG 文件依赖于其 xcf 文件。如果您更改其中一个 GIMP 产品图像(xcf 文件),则 Makefile 将仅重新处理该 xcf 文件。
还为每个产品创建了一个缩略图图像。这里的关键在于,缩略图预计以不同的偏移量显示在背景图像上。这意味着缩略图必须在缩放和保存之前将所有图像数据相对于背景进行移动。如果要在单个页面上显示许多产品,则调用 gimp-monkeyiq-move-visible-layers 将必须计算出每个缩略图要使用的偏移量,以使与背景图像的混合在网站上显示时令人愉悦。
清单 10. 将 xcf 文件转换为合成 JPEG 图像的 Makefile
tmp_img=/tmp/tmp_img.xcf
tmp2_img=/tmp/tmp_img.xcf
background_img=mybackground.png
simplelayered_extension=xcf
simplelayered_targets=\
  $(patsubst %.xcf,%.jpg,$(wildcard *.xcf))

all: $(simplelayered_targets)

$(simplelayered_targets): %.jpg: %.xcf
	if_xcf=$<; \
	if=`basename $< .xcf`.png \
	of=$@; \
	of_thumbnail=`basename $@ .jpg`-thumb.jpg \
        gimp-monkeyiq-append-layer-from-image-file \
           -inputimage `pwd`/$$if_xcf \
           -outputimage $(tmp_img) \
           -layerimage `pwd`/$(background_img) \
	   -layername  "background-layer"; \
        gimp-monkeyiq-save-as-jpg \
           -inputimage  $(tmp_img)
           -outputimage $$of; \
        gimp-monkeyiq-scale \
           -inputimage  `pwd`/$$if_xcf \
           -outputimage $(tmp_img); \
	   -ratio 0.15; \
        gimp-monkeyiq-append-layer-from-image-file \
           -inputimage  $(tmp_img) \
           -outputimage $(tmp2_img) \
           -layerimage `pwd`/$(background_img) \
	   -layername  "background-layer"; \
        gimp-monkeyiq-layers-showall \
           -inputimage  $(tmp2_img) \
           -outputimage $(tmp_img); \
        gimp-monkeyiq-layers-hidebyre \
           -inputimage  $(tmp_img) \
           -outputimage $(tmp2_img) \
	   -layersre "background-layer"; \
        gimp-monkeyiq-move-visible-layers \
           -inputimage  $(tmp2_img) \
           -outputimage $(tmp_img) \
	   -xoffset 200 -yoffset 100; \
        gimp-monkeyiq-save-as-jpg \
           -inputimage $(tmp_img)
           -outputimage $$of;
让我们从简单脚本开始,然后转向清单 10 中更复杂的脚本。gimp-monkeyiq-save-as-jpg 脚本显示在清单 11 中。getMergedLayer() 函数来自清单 3 中显示的 MonkeyIQGIMP 模块。它将所有可见图层作为单个合并图层获取。给定单个图层,可以将其导出为 JPEG,我使用特定的 JPEG 保存 GIMP 函数来允许设置特定于 JPEG 图像压缩的各种参数。除了图像输入/输出参数之外,两个主要参数是质量和注释。能够在 JPEG 图像本身中嵌入注释允许将元数据添加到 Web 图像,例如图像版权和作者数据字符串。
清单 11. 将 GIMP 可以加载的任何图像另存为具有给定压缩参数的 JPEG 图像。
sub monkeyiq_gimp_convert {
  my( $inputimagename, $outfilename, $qual,
      $smoothing, $comment ) = @_;

  $img = gimp_file_load( $inputimagename,
                         $inputimagename );

  $layer = getMergedLayer( $img );

  file_jpeg_save( $img, $layer,
                  $outfilename, $outfilename,
		  $qual, $smoothing, 1, 1,
		  $comment, 0, 1, 0, 1 );
  return $img;
}

register
  ...
  "*",
  [
   [PF_STRING, "inputimage",
      "Name of image to export", ""],
   [PF_STRING, "outputimage",
      "Name of image to save to", ""],
   [PF_FLOAT,  "quality",
      "0-100 quality of JPG", ""],
   [PF_FLOAT,  "smoothing",
      "0-1 smoothing", ""],
   [PF_STRING, "comment",
      "Comment for image", ""],
  ],
  \&monkeyiq_gimp_convert;

exit main();
稍微复杂的脚本是 gimp-monkeyiq-append-layer-from-image-file,它旨在像命令行一样工作cat img1 img2 >| bar命令序列。我们正在将一个图像文件中的图层“附加”到另一个图像文件。从我们要从中读取新图层的图像中,调用 getMergedLayer() 以获取所有可见图层作为单个图层。由于还有其他脚本可以隐藏和显示图像中的图层,因此可以在临时图像文件中准备输入图像,以仅显示所需的图层。输出图像的大小将调整为两个输入图像中较大的大小。附加图层的代码显示在清单 12 中。
清单 12. 将一个图像中的图层附加到另一个图像。
#!/usr/bin/perl -w

use Gimp ":auto";
use Gimp::Fu;
use lib '/usr/local/bin/';
use MonkeyIQGIMP;

sub monkeyiq_gimp_append_layer_from_image_file {
  my($inputimagename, $outfilename,
    $inputimagenameSecond) = @_;

  print "cat $inputimagename";
  print " $inputimagenameSecond >> $outfilename\n";

  $img  = gimp_file_load( $inputimagename,
                          $inputimagename );
  $img2 = gimp_file_load( $inputimagenameSecond,
                          $inputimagenameSecond );

  $layer = getMergedLayer( $img2 );
  if (!$layer->has_alpha)
  {
    $layer->add_alpha;
  }

  $img2->selection_all;
  $layer->edit_copy;
  $newlayer = Gimp->layer_new(
    $img,
    Gimp->image_width( $img2 ),
    Gimp->image_height( $img2 ),
    RGBA_IMAGE,
    "appended image data",
    100,
    NORMAL_MODE );
  $newlayer->drawable_fill(TRANSPARENT_FILL);
  Gimp->image_add_layer( $img, $newlayer, -1 );
  Gimp->image_lower_layer( $img, $newlayer );
  $floater = $newlayer->edit_paste( 1 );
  $floater->anchor;

  $imgw  = Gimp->image_width( $img );
  $imgh  = Gimp->image_height( $img );
  $img2w = Gimp->image_width( $img2 );
  $img2h = Gimp->image_height( $img2 );

  $img->resize( $imgw >= $img2w ? $imgw : $img2w,
                $imgh >= $img2h ? $imgh : $img2h,
                0, 0 );

  imageOutput( $img, $outfilename );
}

register
   ...
  [
   [PF_STRING, "inputimage",
     "Name of image to load", ""],
   [PF_STRING, "outputimage",
     "Name of image to save to", ""],
   [PF_STRING, "newlayerimage",
     "Name of image to append to inputimage", ""],
  ],
  \&monkeyiq_gimp_append_layer_from_image_file;


if( $#ARGV <= 0 ) {
  print "Usage: $0 -inputimage imagepath";
  print " -outputimage full_dst_path ";
  print " -newlayerimage imagepath2 \n\n";
  exit;
}

# Handle over control to gimp
exit main();
可以使用 gimp-monkeyiq-move-visible-layers 和给定的 x,y 增量来移动图层,如清单 13 所示。
清单 13. 稍微移动图层。
...
sub monkeyiq_gimp_move_visible_layers {
  my($inputimagename, $outfilename,
    $xoffset, $yoffset ) = @_;

  $img  = gimp_file_load( $inputimagename,
                          $inputimagename );

  @layers = Gimp->image_get_layers( $img );
  foreach $l (@layers) {
    if( $l->get_visible ) {
      $l->translate ( $xoffset, $yoffset );
    }
  }

  imageOutput( $img, $outfilename );
}
...
  [
   [PF_STRING, "inputimage",
     "Name of image to load", ""],
   [PF_STRING, "outputimage",
     "Name of image to save to", ""],
   [PF_INT, "xoffset",
     "X offset to move layers by", ""],
   [PF_INT, "yoffset",
     "Y offset to move layers by", ""],
  ],
...
图像的尺寸也可以设置为在 PHP 网页中使用。gimp-monkeyiq-get-dimension 创建了一堆 PHP 变量,这些变量设置为有趣的图像元数据(清单 14)。writedata() 函数在输出文件中为所需的输入图层设置 PHP 变量。
清单 14. 从图像中获取元数据以在 PHP 中使用。
...
use MonkeyIQGIMP;
use FileHandle;

sub writedata {
  my( $fh, $name, $ext, $x, $y, $w, $h ) = @_;

  $fh->print(" \$${name}${ext}_width = $w;\n ");
  $fh->print(" \$${name}${ext}_height = $h;\n ");
  $fh->print(" \$${name}${ext}_left = $x;\n ");
  $fh->print(" \$${name}${ext}_top = $y;\n ");
  $fh->print(" \$${name}${ext}_offsetx = $x;\n ");
  $fh->print(" \$${name}${ext}_offsety = $y;\n ");
}

sub monkeyiq_gimp_get_dimension {
  my($inputimagename,$outfilename,
    $desiredlayername) = @_;

  $img = gimp_file_load( $inputimagename,
                         $inputimagename );

  if( length( $desiredlayername ) )
    {
      $layer = getLayerByName(
         $img, $desiredlayername )
       or die("Layer $desiredlayername not found");
    }
  else
    {
      $layer = getMergedLayer( $img );
    }

  $name = gimp_layer_get_name( $layer );
  my( $x, $y ) = gimp_drawable_offsets( $layer );
  $w = gimp_drawable_width( $layer );
  $h = gimp_drawable_height( $layer );

  $fh = new FileHandle;
  if( $fh->open( $outfilename, "w" ))
    {
      $fh->print("<?\n");
      writedata( $fh, $name, "", $x, $y, $w, $h );

      $fh->print("?>\n\n");
      $fh->close();
    }

  gimp_image_delete( $img );
}

register "monkeyiq_gimp_convert",
...
  [
   [PF_STRING, "inputimage",
      "Name of image to export", ""],
   [PF_STRING, "outputfile",
      "Name of file to save metadata into", ""],
   [PF_STRING, "inputlayer",
      "Name of layer to export (optional)", ""],
  ],
  \&monkeyiq_gimp_get_dimension;
...
不仅宽度和高度可用,而且原始 xcf 文件中的位置也已存储。这使得使用 GIMP 构建基于像素偏移的网站变得容易,以定位各种图形元素并自动更新网站偏移。网站可以在 1600x1200 处设计并保存在 xcf 文件中。然后可以使用缩放脚本自动生成 800x600 版本的网站,以及相应的图像偏移和大小元数据。
由于我在 GIMP 方面几乎没有交互式技能,因此图 1 和图 2 中的蛋糕多层图像由 Dennis Braun (info@dennbe.com) 为本文友情制作。
资源
本文代码:sourceforge.net/project/showfiles.php?group_id=16036
GIMP Perl 模块:ftp.gimp.org/pub/gimp/plug-ins/v2.0/perl
GIMP Perl 用户教程:imagic.weizmann.ac.il/~dov/gimp/perl-tut-2.0
GIMP—基本 Perl:www.gimp.org/tutorials/Basic_Perl
Marc Lehmann 的“Gimp”:www.goof.com/pcg/marc/gimp.html
Ben Martin 在文件系统方面工作了十多年。他目前正在攻读博士学位,将语义文件系统与形式概念分析相结合,以改善人机文件系统交互。
