
为什么不用 Python?,第 2 部分
在开始下一个程序之前,我应该提到 Python 首页,它提供了最新版本的解释器和许多关于该语言的有用信息。特别是,这个教程 非常出色。不过,我仍然强烈建议您获取 Mark Lutz 和 David Ascher 合著的 Learning Python (O'Reilly 1999),它比在线教程解释得更透彻。您的 GNU/Linux 机器上也可能带有该教程和其他 Python 文档。我的笔记本电脑上的教程位于
/usr/doc/packages/pyth_doc/html/tut/tut.html
作为 Python 文档包的一部分,在我的情况下是 pyth_doc-1.5.1-11。最新的发行版可能同时包含 PDF 和 HTML 版本的文档,您也可以从 这里 或镜像站点下载它们。
说到发行版,我们需要考虑兼容性问题。我正在一台运行 SuSE Office'99 发行版的笔记本电脑上编写本文的大部分内容,该发行版包含这个版本的 Python
% python
Python 1.5.1 (#1, Sep 24 1998, 04:14:53)  [GCC 2.7.2.1] on linux2
Copyright 1991-1995 Stichting Mathematisch Centrum, Amsterdam
>>>
我上面提到的在线教程要新得多;它自称为 Python 2.4.2 的一部分。本文中的所有程序都已在 Python 2.4 (SuSE 9.3) 和 Python 1.5.1 (SuSE 5.3 - Office'99) 上运行过。
好了,开始下一个程序。
您是否见过让您想编写程序来解决的谜题?几个月前,当我注意到当地报纸上的 数独 时,我就有这种感觉。
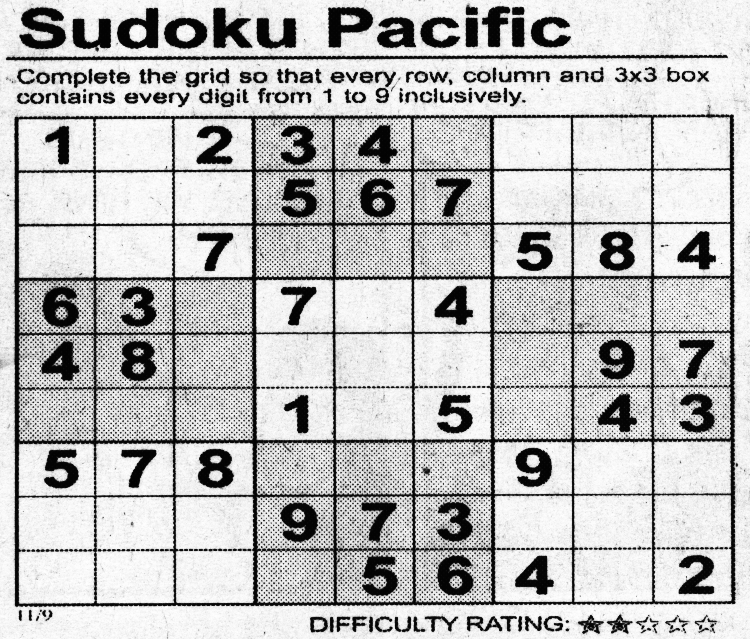
正如您从上图看到的那样,这个谜题由一个 9x9 的矩阵组成,它像井字棋盘一样被划分为九个 3x3 的子矩阵。每个子矩阵、每行和每列都必须包含数字 1-9 中的每一个。
编写一个程序来解决这个谜题应该不会太难。首先,您需要一个数据结构。您可以像这样将单元格从 0-80 编号
   0   1   2   3   4   5   6   7   8
   9  10  11  12  13  14  15  16  17
  18  19  20  21  22  23  24  25  26
  27  28  29  30  31  32  33  34  35
  36  37  38  39  40  41  42  43  44
  45  46  47  48  49  50  51  52  53
  54  55  56  57  58  59  60  61  62
  63  64  65  66  67  68  69  70  71
  72  73  74  75  76  77  78  79  80
或者,您可以为每一行创建一个数组,其中包含所有这些行数组的数组。您也可以用列来做。或者,您可以将每个子矩阵分组到一个一维或二维数组中,并形成一个包含这些子矩阵的一维或二维数组。
所有这些选项都是可能的,但是因为我们必须处理行、列和子矩阵,所以我决定坚持使用一维单元格数组,编号为 0-80。我还决定使用其他一些数据结构来处理行。
对于每个单元格,我们需要跟踪
单元格中的数字(如果已知)
单元格中可能出现的数字集合(如果确切的数字未知)
我们可以有一个数据结构,其中包含所有单元格的已知数字,另一个数据结构,其中包含所有单元格的可能数字集合。或者,我们可以有一个数据结构的单个数组,每个单元格对应一个数据结构。每个数据结构都将包含关于其单元格的所有信息,无论数字是已知还是未知。
某种东西——称之为程序员的直觉——让我感觉后一种选择会使编码更容易。
所以我们将有一个数组,编号为 0-80。数组中的每个元素都是一个数据结构,用于告诉我们数字(如果已知)。如果确切的数字未知,则数组会告诉我们可能数字的集合。i
然而,数据结构本身不是程序;我们需要对其进行操作。程序必须做的,本质上是
读取指定的单元格的值,并对空白单元格做出一些初步的推断
填充空白单元格;也就是说,解决谜题)
打印出答案
回到 1970 年代,这个叫做“结构化编程”的新事物谈到了自顶向下设计和逐步求精。其思想是将大步骤分解为可以自信编码的小块。
我喜欢这个想法,但我也喜欢叫做“极限编程”的新新事物,它说要在编写代码之前编写测试用例。所以我决定在步骤 #1 中实践这个想法。我将一个谜题输入到代码中,并检查了一些空白单元格,以确保我们适当地限制了可能性。
首先读取指定的单元格的值,并对空白单元格做出一些初步的推断。如果程序可以读取报纸并进行光学字符识别 (OCR) 以识别数字,那可能会很酷。但即使可以,OCR 部分仍然需要将数字传达给问题解决部分。让我们将自己限制在问题解决部分,并将 OCR 留给键盘后面的人。
那么,让程序从文件中读取数字。与其做任何花哨的事情,不如让它忽略空格。让每个数字代表它自己,并使用 - 来表示空白单元格。我们也可以允许 . 表示空白单元格,这就是我在 数独 留言板上看到的内容。因此,以下将是有效的输入
        1-234----
        ---567---
        --7---584
        63-7-4---
        48-----97
        ---1-5-43
        578---9--
        ---973---
        ----564-2
就像这样
        1.234.......567.....7...58463.7.4...48.....97
        ...1.5.43578...9.....973.......564.2
或者这样
         1 - 2 3 4 - - - -
         - - - 5 6 7 - - -
         - - 7 - - - 5 8 4
         6 3 - 7 - 4 - - -
         4 8 - - - - - 9 7
         - - - 1 - 5 - 4 3
         5 7 8 - - - 9 - -
         - - - 9 7 3 - - -
         - - - - 5 6 4 - 2
所有这些输入变体都意味着完全相同的事情。也就是说,所有这些都代表了从报纸上扫描的图像中显示的谜题。
现在,除了读取字符外,程序还应该在数据结构中填充适当的值。实际上,甚至在我们开始之前,我们应该初始化每个单元格的结构,以表明该值未知,但可以是任何值。换句话说,可能数字的集合将是 {1,2,3,4,5,6,7,8,9}。
然后,当我们读取值时,当我们找到一个已知值时,我们将“如果已知”部分设置为该值。然后,我们将从该单元格所在行、列和 3x3 子矩阵的 set_of_possibles 中删除该值。
行号范围为 (0,9),单元格 0-8 在第 0 行,单元格 9-17 在第 1 行,依此类推。我们可以通过取 int(pos/9) 来计算行号,其中 pos 是单元格位置。
列号范围为 (0,9),单元格 0,9,18,27... 在第 0 列;单元格 1,10,19,28... 在第 1 列,依此类推。列号通过取 (pos%9) 计算得出。

子矩阵编号为 0-8。行号在 (0,3) 范围内且列号在 (0,3) 范围内的单元格位于子矩阵 0 中;列号在 (3,6) 范围内的单元格位于子矩阵 1 中,依此类推。这些子矩阵的布局如下

因此,子矩阵 0 由单元格 0,1,2,9,10,11,18,19,20 组成。子矩阵 1 由单元格 3,4,5,12,13,14,21,22,23 组成。为了计算子矩阵编号,我们不需要确切的行号和列号;我们只需要 int(myrow/3) 和 int(mycol/3)
mysub = int(myrow/3) * 3 + int(mycol/3)
为了测试代码的这一部分,我们输入上面的示例并使用 Python 调试器 (pdb) 来检查它
虽然单元格 8(右上角)尚“未知”,但它可能是 6 或 9。
单元格 72(左下角)可以是 3 或 9。
子矩阵 2 包含单元格 8。
子矩阵 6 包含单元格 72。
现在,为了完成步骤 1 的“逐步求精”部分,我们将每个单元格初始化为包含
        value=unknown
        set_of_possibles={1,2,3,4,5,6,7,8,9}
我们还从输入文件中读取每个值。如果值未知——“-”或“.”——则保持单元格不变。如果已知,则将数据结构的数字(“如果已知”部分)设置为该已知值。然后,清除该单元格的 set_of_possibles。最后,从该单元格所在行、列和 3x3 子矩阵的可能数字集合中删除该值。
好了,让我们开始编码吧!我们有一个单元格数组(Python 中的“列表”)。对于每个单元格,我们需要了解它属于哪些行、列和子矩阵。
Python 书籍谈到了“类”,这将给我一个尝试面向对象编程的机会。
好的,经过一番思考,这是我想出的。注意:与 第 1 部分 中的“Coconuts”程序不同,后者简短易懂,而这个程序我遇到了一些错误。详细信息在附录 A 中概述。
    1   class Cell:
    2      rows = [ [], [], [], [], [], [], [], [], [] ]    # nine each...
    3      columns = [ [], [], [], [], [], [], [], [], [] ]
    4      submatrices = [ [], [], [], [], [], [], [], [], [] ]
    5
    6      # for step 1.1, do "cells[i]=Cell(i)" for i in range(0,81)
    7      def __init__(self,pos):
    8         # "pos" = position in the puzzle.  Valid values: range (0,81)
    9         global rows, columns, submatrices
   10         if pos not in range(0,81): raise Illegal_pos_in_Cells_initializer
   11         self.pos = pos
   12         self.value = 0
   13         self.set_of_possibles = range(1, 10)  # 1-9 INclusive
   14
   15         # For step 1.2.2b, track which row, col, sub that I belong to.
   16         myrow = int(pos / 9)
   17         mycol = pos % 9
   18         mysub = int(myrow/3) * 3 + int(mycol/3)
   19
   20         self.row = Cell.rows[myrow]
   21         self.col = Cell.columns[mycol]
   22         self.sub = Cell.submatrices[mysub]
   23
   24         self.row.append(self)
   25         self.col.append(self)
   26         self.sub.append(self)
   27
   28      def known(self):
   29         return (self.value != 0)
   30
   31      # setvalue is used for 1.2.2
   32      def setvalue(self, val):
   33         # a couple of sanity checks
   34         if val not in range(1,9+1): raise val_must_be_between_1_and_9
   35         if val not in self.set_of_possibles: raise setting_impossible_value
   36         if self.known(): raise setvalue_called_but_already_known
   37
   38         self.value = val              # 1.2.2a
   39
   40         # Now do 1.2.2b
   41         for other in self.row + self.col + self.sub:
   42            if other is self: continue
   43            if other.known(): continue
   44            if val in other.set_of_possibles:
   45               # Python 1.5.1 had "remove", which isn't in the book.
   46               # Deprecated?
   47               x = other.set_of_possibles.index(val)
   48               del other.set_of_possibles[x]
   49
   50   import sys
   51   def doit(argv):
   52      cells = []
   53      for i in range(0,81): cells.insert(i,Cell(i))          # 1.1
   54
   55      # Here, any cell's set_of_possibles should be full
   56
   57      if len(argv) > 1 and argv[1]:
   58         input = open(argv[1], 'r')
   59      else:
   60         input = sys.stdin
   61
   62      all_input_lines = input.readlines()
   63      input.close()
   64
   65      which_cell = 0
   66      for one_input_line in all_input_lines:
   67         for char in one_input_line:
   68            if char in '\t\n ': continue
   69            if char in '-.':
   70               which_cell = which_cell + 1
   71            elif ord(char) in range (ord('1'), ord('9')+1):
   72               cells[which_cell].setvalue(ord(char)-ord('0'))
   73               which_cell = which_cell + 1
   74            if which_cell > 81: raise too_much_input
   75      pass   # so the debugger can break here
   76
   77   # main begins here
   78   doit(sys.argv)
我将尝试解释一下。第 1-48 行描述了一个名为“Cell”的类,它具有
三个列表:行、列和子矩阵(第 2-4 行)
一个初始化函数(第 7-26 行)
一个用于说明给定单元格的值是否已知的函数(第 28-29 行)
一个实现该算法的函数(第 32-48 行)
类“Cell”的每个实例代表谜题中的一个单元格,并包括以下属性
pos:在谜题中的位置。0 表示左上角,80 表示右下角。
value:如果尚不知道则为零;否则,是 1 到 9 之间的数字(包括 1 和 9)。
set_of_possibles:一个 Python 列表,其中包含我们所知的单元格可能的值。一旦值已知,set_of_possibles 就会被清除(设置为空列表)。
row:一个单元格列表,其中包含与此单元格在同一行中的单元格;它实际上是对 Cell.rows 元素的引用。
col, sub:类似于“row”,但分别对应于单元格的列和子矩阵。
行、列和子矩阵的计算在第 16-18 行中进行。此 __init__ 函数假定它将为 range(0,81) 中“pos”的每个值精确调用一次。
对于设置单元格的值,调用“setvalue”函数。在第 34-36 行中进行了一些简单的检查——值是否合法?您是否将单元格设置为我们已经知道它不能是的值?——值本身在第 38 行中设置。第 41-48 行查找同一行、列或子矩阵中的所有单元格,并从 set_of_possibles 中删除“val”。
第 51-75 行描述了“doit”函数。我的原始版本没有将其作为函数,但现在将其放入函数中是为了更方便地进行调试。它初始化 cells[] 列表,然后决定(第 57-60 行)是从文件还是从 stdin 获取谜题。
第 66-74 行解释输入并为相应的单元格调用“setvalue”函数。
第 78 行只是告诉 Python,当运行时,它应该执行“doit”函数。
下一个问题是:代码真的有效吗?事实证明,pdb 不完全像 gdb,因为我必须修改模块才能调试它。我的意思是:您导入模块,导入 pdb,然后执行 pdb.run 函数。但是当您导入模块时,它会执行模块中的所有内容。这就是为什么我使用函数“doit”,它在第 51 行执行所有操作。为了调试 s0.py,我还必须注释掉第 78 行,像这样
     % vi s0.py              ## could have used any other editor...
     % pr -tn s0.py|tail
        69            if char in '-.':
        70               which_cell = which_cell + 1
        71            elif ord(char) in range (ord('1'), ord('9')+1):
        72               cells[which_cell].setvalue(ord(char)-ord('0'))
        73               which_cell = which_cell + 1
        74            if which_cell > 81: raise too_much_input
        75      pass   # so the debugger can break here
        76
        77   # main begins here
        78   # doit(sys.argv)     ## COMMENT OUT FOR DEBUGGING
     %
解决了这个问题之后,回顾一下四个测试用例
虽然单元格 8(右上角)尚“未知”,但它可能是 6 或 9。
单元格 72(左下角)可以是 3 或 9。
子矩阵 2 包含单元格 8。
子矩阵 6 包含单元格 72。
那么让我们试试看!
     % python
     Python 1.5.1 (#1, Sep 24 1998, 04:14:53)  [GCC 2.7.2.1] on linux2
     Copyright 1991-1995 Stichting Mathematisch Centrum, Amsterdam
     >>> import s0

    ### The file is "s0.py" but when "import"ing, you don't type ".py"

     >>> import pdb
     >>> pdb.run('s0.doit(["s0.py", "1109.puz"])')

    ### For pdb.run, you have to qualify the name of the function with
    ### the module name.

     > <string>(0)?()
     (Pdb) break s0.doit
    (Pdb) n
     > s0.py(51)doit()
     -> def doit(argv):
     (Pdb) l 70
      65        which_cell = 0
      66        for one_input_line in all_input_lines:
      67           for char in one_input_line:
      68              if char in '\t\n ': continue
      69              if char in '-.':
      70                 which_cell = which_cell + 1
      71              elif ord(char) in range (ord('1'), ord('9')+1):
      72                 cells[which_cell].setvalue(ord(char)-ord('0'))
      73                 which_cell = which_cell + 1
      74              if which_cell > 81: raise too_much_input
      75        pass   # so the debugger can break here
     (Pdb) b 75

    ### I wanted to have a breakpoint at the end of the function doit,
    ### so I put in an artificial "pass" statement in line 75

     (Pdb) c
     > s0.py(75)doit()
     -> pass   # so the debugger can break here
     (Pdb) p cells[8].set_of_possibles
     [6, 9]
     (Pdb) p cells[8].known()
     0

    ### My first test case: cell 8 is not known, and its possible values
    ### are 6 and 9.  Whee!

     (Pdb) p cells[72].set_of_possibles
     [3, 9]
     (Pdb) p cells[72].known()
     0
     (Pdb) for x in Cell.submatrices[2]: print x.pos,
     6 7 8 15 16 17 24 25 26(Pdb) print

    ### Sorry for the ugly formatting.  I wanted to print out the
    ### "cell numbers" of each cell in the "submatrices" array and
    ### do it in a single line.  It printed the cells in submatrices[2]
    ### and didn't start a new line -- so the Pdb prompt was stuck on
    ### the end of the line.  Saying "print" got us to a new line.

    ### Bottom line, though: submatrices[2] does contain cell 8.
    ### And submatrices[6] contains cell 72:

     (Pdb) for x in Cell.submatrices[6]: print x.pos,
     54 55 56 63 64 65 72 73 74(Pdb) print

     (Pdb) quit
     >>>
     %
这就是算法步骤 1 的代码。
拥有调试器比没有调试器要好,但是调试器需要几个手动步骤——这很费力。我相信 Perl 的发明者 Larry Wall 将“懒惰”列为优秀程序员的一个属性。在测试方面,Larry 尤其正确。必须易于运行测试,否则人们——在这种情况下指的是我,可能也包括您——将无法正确地执行测试。结果将是错误的,要么是误报,要么是漏报。因此,最好不必使用调试器来测试我们的程序。因此,让我们编写步骤 3,“粘合”到步骤 1 上,并将这两个部分一起测试。
现在我们需要打印出答案。我们应该在这里做的是打印出每个单元格中的数字。如果我们在步骤 1 之后立即运行它,则某些单元格将是未知的。让我们将这些单元格打印为“-”,即以该程序稍后可以读取的形式。
我们可以将此添加到上次程序的末尾。
       for bor in range(0,81,9):
          for i in range(bor,bor+9):
             if cells[i].value > 0: print cells[i].value,        # usual case
             elif len(cells[i].set_of_possibles) > 0: print '-', # unknown
             else: print '?',                                    # inconsistent!!
          print                        # end of this row
结合第 1 部分和第 3 部分,我们得到
        % python
        Python 1.5.1 (#1, Sep 24 1998, 04:14:53)  [GCC 2.7.2.1] on linux2
        Copyright 1991-1995 Stichting Mathematisch Centrum, Amsterdam
        >>> import s1
        >>> import pdb
        >>> pdb.run('s1.doit(["p1", "1109.puz"])')
        > <string>(0)?()
        (Pdb) n
        > <string>(1)?()
        (Pdb) n
        1 - 2 3 4 - - - -
        - - - 5 6 7 - - -
        - - 7 - - - 5 8 4
        6 3 - 7 - 4 - - -
        4 8 - - - - - 9 7
        - - - 1 - 5 - 4 3
        5 7 8 - - - 9 - -
        - - - 9 7 3 - - -
        - - - - 5 6 4 - 2
        --Return--
        > <string>(1)?()->None
        (Pdb) quit
        >>>
        %
它工作了,所以我更改了程序以在最后打印输出,并使 doit 函数在没有干预的情况下运行。这样,我就不必每次都运行调试器了。程序末尾现在看起来像这样
    % pr -tn s1.py | tail -12
       77      # Step 2 should go here
       78
       79      # Code for step 3
       80      for bor in range(0,81,9):
       81         for i in range(bor,bor+9):
       82            if cells[i].value > 0: print cells[i].value,        # usual case
       83            elif len(cells[i].set_of_possibles) > 0: print '-', # unknown
       84            else: print '?',                                    # inconsistent!!
       85         print                        # end of this row
       86
       87   # main begins here
       88   doit(sys.argv)     ## COMMENT OUT FOR DEBUGGING
它可以像这样处理输入
        % python s1.py 1109.puz
        1 - 2 3 4 - - - -
        - - - 5 6 7 - - -
        - - 7 - - - 5 8 4
        6 3 - 7 - 4 - - -
        4 8 - - - - - 9 7
        - - - 1 - 5 - 4 3
        5 7 8 - - - 9 - -
        - - - 9 7 3 - - -
        - - - - 5 6 4 - 2
        %
查看上面内容,我意识到我以前的 C 程序员的自己违反了面向对象编程的原则之一——信息隐藏。“Cell”类应该完全封装单元格数据结构的内部,用户应该使用访问器函数(例如 setvalue)来访问内部。第 82 行和第 83 行“窥视”了数据结构内部,因此让我添加一个“getvalue”访问器函数,并更改步骤 3 代码以使用“known”函数。以下是更改的部分,带有“*”表示新行或更改的行
  47               x = other.set_of_possibles.index(val)
  48               del other.set_of_possibles[x]
  49
* 50      def getvalue(self): return self.value
  51
  52   import sys
  53   def doit(argv):
  ...
  81      # Code for step 3
  82      for bor in range(0,81,9):
  83         for i in range(bor,bor+9):
* 84            if cells[i].known(): print cells[i].getvalue(),     # usual case
* 85            else: print '-',                                    # unknown
  86         print                        # end of this row
  87
  88   # main begins here
这个版本更简洁,而且它仍然可以在没有调试器的情况下运行。
我们将在本文的下一部分处理算法的步骤 2。
这是我上面代码的原始版本。它包含几个错误
    1   class Cell:
    2      rows = [ [], [], [], [], [], [], [], [], [] ]    # nine each...
    3      columns = [ [], [], [], [], [], [], [], [], [] ]
    4      submatrices = [ [], [], [], [], [], [], [], [], [] ]
    5
    6      # for step 1.1, do "cells[i]=Cell(i)" for i in range(0,81)
    7      def __init__(self,pos):
    8         # "pos" = position in the puzzle.  Valid values: range (0,81)
    9         global rows, columns, submatrices
   10         if pos not in range(0,81): throw Illegal_pos_in_Cells_initializer
   11         self.pos = pos
   12         self.value = 0
   13         self.set_of_possibles = range(1, 10)  # 1-9 INclusive
   14
   15         # For step 1.2.2b, track which row, col, sub that I belong to.
   16         myrow = int(pos / 9)
   17         mycol = pos % 9
   18         mysub = int(myrow/3) * 3 + int(mycol/3)
   19         # The above calculation of "mysub" may be a little obscure, so
   20         # let me explain.
   21         #
   22
   23         self.row = rows[myrow]
   24         self.col = columns[mycol]
   25         self.sub = submatrices[mysub]
   26
   27         rows[myrow].append(self)
   28         columns[mycol].append(self)
   29         submatrices[mysub].append(self)
   30
   31      def known(self):
   32         return (self.value != 0)
   33
   34      # setvalue is used for 1.2.2
   35      def setvalue(self, val):
   36         # a couple of sanity checks
   37         if val not in range(1,9+1): throw val_must_be_between_1_and_9
   38         if val not in self.set_of_possibles: throw setting_impossible_value
   39         if self.known(): throw setvalue_called_but_already_known
   40
   41         self.value = val              # 1.2.2a
   42
   43         # Now do 1.2.2b
   44         for other in self.row + self.col + self.sub:
   45            if other is self: continue
   46            if other.known(): continue
   47            if val in other.set_of_possibles:
   48               # Python 1.5.1 had "remove", which isn't in the book.
   49               # Deprecated?
   50               x = other.set_of_possibles.index(val)
   51               other.set_of_possibles.del(x)
   52
   53   import sys
   54   # main begins here
   55   cells = []
   56   for i in range(0,81): cells.insert(i,Cells(i))          # 1.1
   57
   58   # Here, any cell's set_of_possibles should be full
   59
   60   if sys.argv[1]:
   61      input = open(sys.argv[1], 'r')
   62   else:
   63      input = sys.stdin
   64
   65   all_input_lines = input.readlines()
   66   input.close()
   67
   68   which_cell = 0
   69   for one_input_line in all_input_lines:
   70      for char in one_input_line:
   71         if char in '\t\n ': continue
   72         if char in '-.':
   73            which_cell = which_cell + 1
   74         elif ord(char) in range (ord('1'), ord('9')+1):
   75            cells[which_cell].setval(ord(char)-ord('0'))
   76            which_cell = which_cell + 1
   77         if which_cell >= 81: throw too_much_input
在代码实际运行之前,我尝试和更改了六次。以下是发生的情况。当我想引发异常时,我写了“throw”而不是“raise”。虽然我读过精细的手册,但我忘记了魔法词,而 Python 不喜欢这样
        % python s0.py
          File "s0.py", line 10
            if pos not in range(0,81): throw Illegal_pos_in_Cells_initializer
                                                                            ^
        SyntaxError: invalid syntax
        %
所以我将所有“throw”都更改为“raise”。
因为追加到列表是使用 LIST.append() 完成的,所以我不知何故认为删除应该以相同的方式完成。
        % python s0.py
          File "s0.py", line 51
            other.set_of_possibles.del(x)
                                     ^
        SyntaxError: invalid syntax
        %
正确的语法是
del other.set_of_possibles[x]
然后,我犯了一个打字错误。我在第 56 行中键入了“Cells”而不是“Cell”。“Cell”是类的名称,“cells”是一个数组,或者在 Python 中是“列表”
        % python s0.py
        Traceback (innermost last):
          File "s0.py", line 56, in ?
            for i in range(0,81): cells.insert(i,Cells(i))          # 1.1
        NameError: Cells
        %
将其更改为“Cell(i)”解决了问题。
下一个错误更难修复;这是一个名称作用域问题
        % python s0.py
        Traceback (innermost last):
          File "s0.py", line 56, in ?
            for i in range(0,81): cells.insert(i,Cell(i))          # 1.1
          File "s0.py", line 23, in __init__
            self.row = rows[myrow]
        NameError: rows
        %
在查阅了书籍后,我意识到我必须在这里使用“Cell.rows”。对类数据的全部引用都需要通过类名来限定,即“Cell”。因此,在修复了它以及“Cell.columns”和“Cell.submatrices”之后,情况看起来好多了。
在语法错误得到控制之后,还有一些其他的愚蠢错误需要修复,例如这个
        % python s0.py
        Traceback (innermost last):
          File "s0.py", line 60, in ?
            if sys.argv[1]:
        IndexError: list index out of range
        %
在没有首先检查 sys.argv 的长度的情况下,我无法确定 sys.argv[1] 是否存在。因此,现在我在访问 sys.argv 的长度之前检查了它的长度。
修复了这个问题之后,我尝试运行代码。它没有立即报错,而是等待输入。现在我开始有所进展了。我使用鼠标从上面复制粘贴了谜题
        % python s0.4.py
                 1 - 2 3 4 - - - -
                 - - - 5 6 7 - - -
                 - - 7 - - - 5 8 4
                 6 3 - 7 - 4 - - -
                 4 8 - - - - - 9 7
                 - - - 1 - 5 - 4 3
                 5 7 8 - - - 9 - -
                 - - - 9 7 3 - - -
                 - - - - 5 6 4 - 2
        Traceback (innermost last):
          File "s0.4.py", line 75, in ?
            cells[which_cell].setval(ord(char)-ord('0'))
        AttributeError: setval
        %
又一个打字问题!我使用了“setval”而不是“setvalue”,这很容易修复。
我将谜题数据放入一个名为 1109.puz 的文件中,并以这种方式运行程序;我不喜欢使用鼠标。
下一个问题是这个
        % python s0.5.py 1109.puz
        Traceback (innermost last):
          File "s0.5.py", line 77, in ?
            if which_cell >= 81: raise too_much_input
        NameError: too_much_input
        %
which_cell 总是告诉我到目前为止我已经处理了多少个单元格。因此,在读取了最后一个单元格(数组中的第 80 个单元格)的信息之后,which_cell 将为 81。换句话说,这是一个差一错误。我将“>=”更改为“>”,之后我得到了
        % python s0.6.py 1109.puz
        %
万岁!没有报错。最终版本就是本文主要部分中出现的内容。
Collin Park 在 Network Appliance 工作,他在那里使用 Linux 桌面和笔记本电脑。他在家从事数据恢复和其他与 Linux 相关的工作,他和妻子以及两个十几岁的女儿住在一起。他们都使用 Linux 来满足他们的计算需求。
